> ## Documentation Index
> Fetch the complete documentation index at: https://docs.runalloy.com/llms.txt
> Use this file to discover all available pages before exploring further.
# Creating & Managing E-Commerce Orders with Alloy
> Hook your platform or order management system up to popular e-commerce platforms like Shopify and BigCommerce, giving your customers the ability to directly create and manage orders.
## Overview
E-commerce merchants typically use popular platforms like Shopify, BigCommerce, WooCommerce, or Shopline for their primary storefronts. However, sales often occur through multiple channels—customer service calls, social media platforms, marketplace listings, or direct inquiries. For ISVs building commerce-enabled platforms, this creates a critical need: your customers must be able to sync order data seamlessly across all their sales channels and e-commerce platforms. This documentation covers how to capture orders from your platform and enable customers to automatically sync that order data to their preferred e-commerce platform, ensuring consistent inventory, customer records, and fulfillment processes regardless of where the sale originated.
## Components of Orders
### Core Components
* **Order Information:** Order ID, date, and status
* **Customer & Addresses:** Who is buying and where to send it
* **Products & Quantities:** What was ordered and how much
* **Pricing:** Costs, taxes, and total amount
### Secondary Components
* **Payment:** How the customer paid
* **Shipping:** Delivery method and tracking
* **Metadata:** Timestamps, notes, and business rules
## Referencing Customers, Inventory, and Other Related Records
Orders contain many interlocking components and references to other entities and record types like customers, inventory items, and tax jurisdictions. When creating orders in e-commerce platforms, you'll need to reference existing records rather than creating everything from scratch. Most platforms expect internal IDs for related entities.
### Customer Records
Before creating an order, check if the customer already exists in the target platform using email or phone number. If found, use their internal customer ID. If not, create a new customer record first and capture the returned ID for the order.
### Product and Inventory Management
Orders must reference actual products in the e-commerce platform's catalog. You'll need to:
* **Map SKUs:** Match your product identifiers to the platform's SKU or product ID
* **Verify Inventory:** Check stock levels before creating orders to prevent overselling
* **Handle Variants:** Reference specific product variants (size, color, etc.) using variant IDs
### Related Records
* **Shipping Zones & Tax Rules:** Ensure delivery addresses align with the platform's configured shipping zones and tax calculations.
* **Payment Methods:** Reference supported payment gateways and ensure payment method codes match the platform's accepted values.
* **Discount Codes:** If applying promotions, verify discount codes exist and are valid in the target platform.
## Building Your First Integration
Select the appropriate drop-down below based on which Alloy Automation product you’ll be building with.
### 1. Choose an E-Commerce Platform to Integrate With
Popular e-commerce platforms include Shopify, WooCommerce, BigCommerce, and Shopline. Most of these platforms handle order placement very similarly so you'lld find a lot of the steps covered here fairly universal
### 1A. Capture Global Values as Account Variables (Optional)
You may want to offer your users the ability to set certain default values, for example currency. To do so, you'll create a dedicated workflow that triggers [on installation](https://docs.runalloy.com/embedded/on-installation-trigger#on-installation-trigger). The second step will be an [Account Variable](https://docs.runalloy.com/embedded/variable-blocks#using-variables-in-embedded) node containing separate variables for each default value you want to capture.
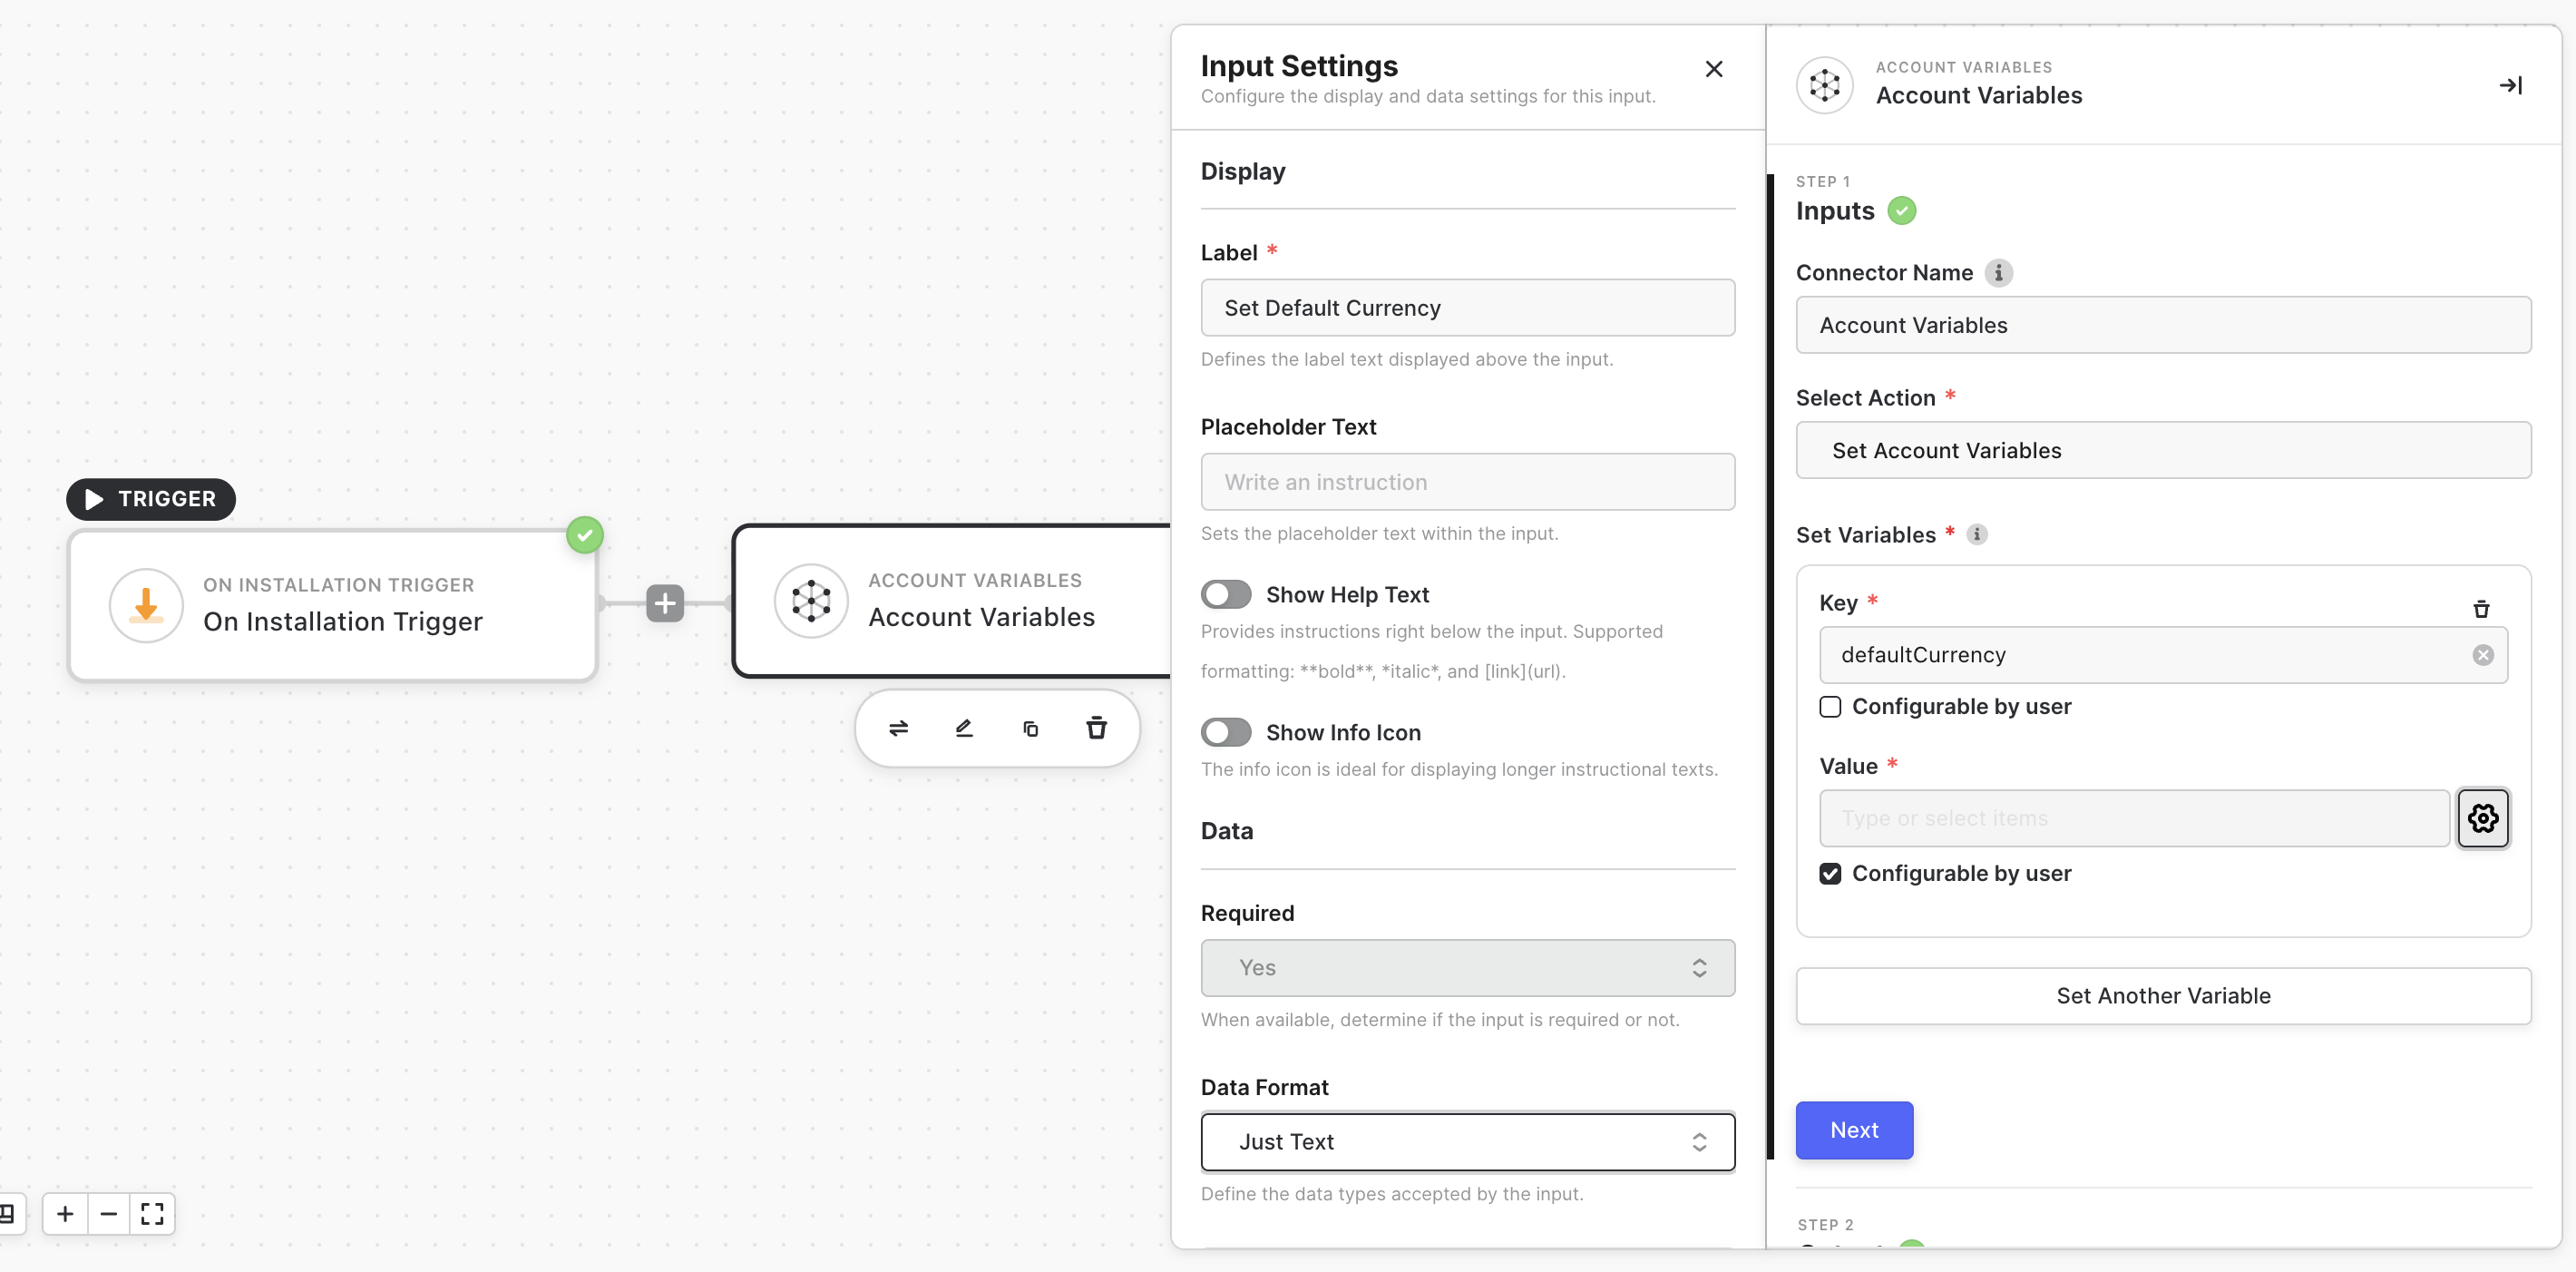 Make sure you check off the**Configurable by user** setting which will expose this variable to your end-users when they install. You can create your own label and help text to better instruct end-users on how to utilize this field.
### 2. Choose a Workflow Trigger
Here, we'll assume that the orders are originating in your platform, as the ISV, or a platform that you manage on behalf of your customers. As order fulfillment is a fairly time-sensitive process we suggest chooseing a real-time or near-real-time method for syncing order data from your systems into your e-commerce platform of choice:
* [Custom Event](https://docs.runalloy.com/embedded/custom-events#custom-events) - Invoked in your systems and can be used to pass along order data as individual orders are created
* **Recurring Sync** - Can be used to run the order syncing workflow on a recurring basis, should also be combined with a polling endpoint from which the workflow can pull bulk orders via [Custom API Call](https://docs.runalloy.com/embedded/custom-api-calls#custom-api-calls)
### 3. Send Order Data to Alloy
If using a Custom Event to send real-time order data from your systems, you can pass the entire order payload as part of the Custom Event schema. If you'll be polling a bulk order export endpoint on your REST API instead, you can pass along an array of order payloads.
We recommend filtering for orders created since the last sync. Use a Date Utility block to generate the current timestamp, subtract your sync interval (e.g., 15 minutes), and pass this resulting timestamp to the bulk export endpoint's 'created\_at' filter to retrieve only new orders.
When building your order payload schema, you can reference the example payload below, which contains the typical fields and values that most e-commerce platforms require.
```json theme={null}
{
"orderId": "ORD-2025-001234",
"orderNumber": "1234",
"orderDate": "2025-01-15T14:30:00Z",
"status": "confirmed",
"customer": {
"id": "CUST-456789",
"email": "customer@example.com",
"firstName": "John",
"lastName": "Smith",
"phone": "+1-555-0123"
},
"billingAddress": {
"firstName": "John",
"lastName": "Smith",
"company": "Acme Corp",
"address1": "123 Main Street",
"address2": "Suite 100",
"city": "New York",
"state": "NY",
"zipCode": "10001",
"country": "US",
"phone": "+1-555-0123"
},
"shippingAddress": {
"firstName": "John",
"lastName": "Smith",
"company": "Acme Corp",
"address1": "456 Business Ave",
"address2": "",
"city": "Brooklyn",
"state": "NY",
"zipCode": "11201",
"country": "US",
"phone": "+1-555-0124"
},
"lineItems": [
{
"id": "LINE-001",
"productId": "PROD-789",
"sku": "TEE-BLK-M",
"title": "Black T-Shirt",
"variant": "Medium",
"quantity": 2,
"price": 29.99,
"totalPrice": 59.98
},
{
"id": "LINE-002",
"productId": "PROD-456",
"sku": "HAT-RED-OS",
"title": "Red Baseball Cap",
"variant": "One Size",
"quantity": 1,
"price": 24.99,
"totalPrice": 24.99
}
],
"pricing": {
"subtotal": 84.97,
"tax": 7.65,
"shipping": 9.99,
"discount": 5.00,
"total": 97.61,
"currency": "USD"
},
"shipping": {
"method": "Standard Ground",
"carrier": "UPS",
"trackingNumber": "1Z999AA1234567890",
"estimatedDelivery": "2025-01-20"
},
"payment": {
"method": "credit_card",
"status": "paid",
"transactionId": "TXN-987654321",
"gateway": "stripe"
},
"notes": "Please leave at front door",
"tags": ["online", "first-time-customer"],
"createdAt": "2025-01-15T14:30:00Z",
"updatedAt": "2025-01-15T14:45:00Z"
}
```
### 4. Check for Existing References
Before sending the order payload to your e-commerce connector, you'll want to make sure that there are valid customers, inventory items, and SKUs to reference and attach to the order.
Once you have the order payload from your systems – either single order or bulk – you'll want to perform a few lookups against the chosen e-commerce connector for each of these. The logic should work as such
1. Receive **order** payload
2. Take **customer email** or other identifying info and lookup customer via connector 'read customer' action
3. **If customer exists** move to next step **otherwise** create the customer using the info in the order payload
4. Next, perform this same process with all other entities you must reference like**inventory item** or **tax jurisdiction**
To simplify order creation, we recommend setting up separate workflows that regularly sync inventory and customer data from your target e-commerce platforms back to your system. This allows you to store platform-specific IDs locally and reference them directly in order payloads, eliminating the need for real-time lookups during order creation workflows.
Take a look at [THIS](#) Blueprint on syncing inventory, customer, and pricing data between your platform and Alloy's e-commerce connectors.
### 4A. Rebuild Order Payload with Connector Internal IDs (Optional)
If you're looking up internal IDs stored in the e-commerce platform like **Inventory Item ID** or **Customer ID** and if you feel comfortable using our [Custom Code](https://docs.runalloy.com/embedded/special-blocks/custom-code#custom-code) utility, you can actually rebuild the incoming order payload by adding item IDs into line item objects, customer IDs into the customer object, etc. This will ultimately make it easier when mapping fields into the 'create customer' action within your chosen e-commerce connector as you won't be pulling from multiple blocks, only the output of the custom code block.
### 4B. Read Global Values from Account Variables (Optional)
If you've saved certain default values within your account Variables (step 1A), the next step is to add an Account Variable node and set the action to**Read Account Variables** . This will output\_all\_ of your Account Variables, allowing you to map the correct values to the correct fields in your e-commerce connector action.
### 5. Create Order in E-Commerce Connector
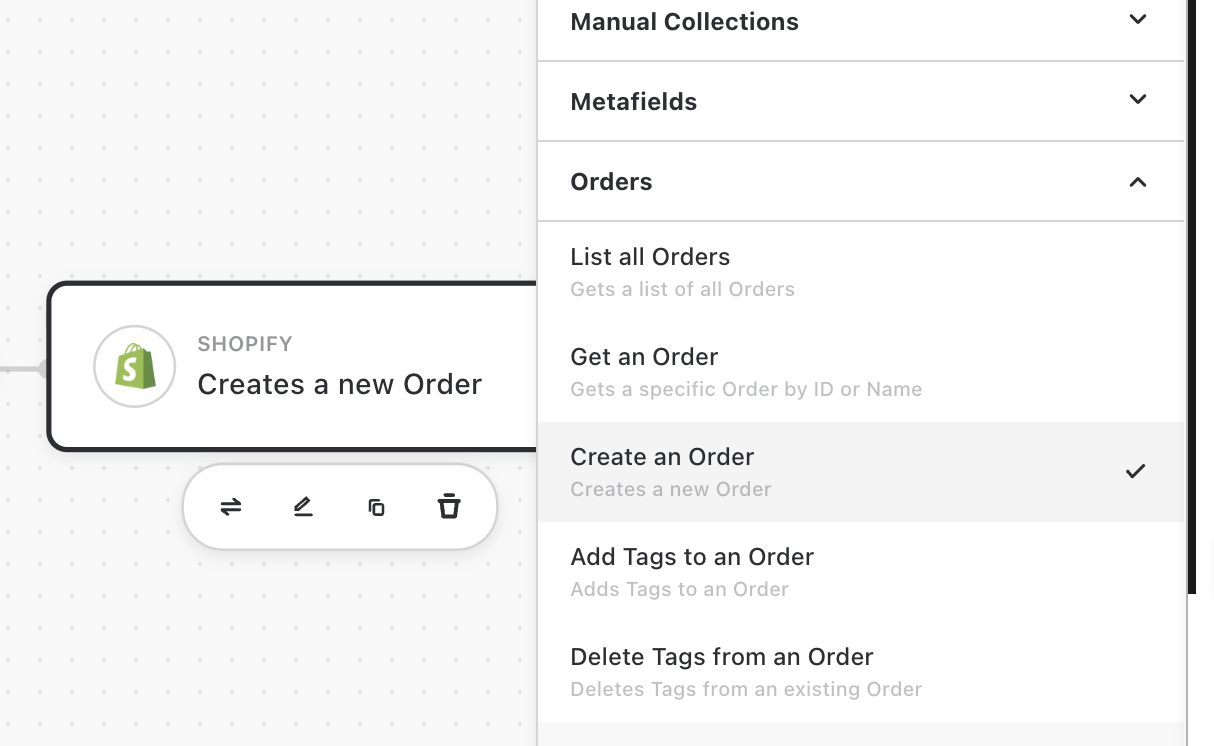
Once you have all of the necessary values, objects, and reference IDs to create the order, the next step is to do so. Select your E-Commerce of choice and look for an 'Orders' – or similarly-named – dropdown in the**Connector Actions** menu. From here's you'll select the relevant 'Create Order' action and map field values from your originating order payload, customer and item lookups, and Account Variables.
Make sure you check off the**Configurable by user** setting which will expose this variable to your end-users when they install. You can create your own label and help text to better instruct end-users on how to utilize this field.
### 2. Choose a Workflow Trigger
Here, we'll assume that the orders are originating in your platform, as the ISV, or a platform that you manage on behalf of your customers. As order fulfillment is a fairly time-sensitive process we suggest chooseing a real-time or near-real-time method for syncing order data from your systems into your e-commerce platform of choice:
* [Custom Event](https://docs.runalloy.com/embedded/custom-events#custom-events) - Invoked in your systems and can be used to pass along order data as individual orders are created
* **Recurring Sync** - Can be used to run the order syncing workflow on a recurring basis, should also be combined with a polling endpoint from which the workflow can pull bulk orders via [Custom API Call](https://docs.runalloy.com/embedded/custom-api-calls#custom-api-calls)
### 3. Send Order Data to Alloy
If using a Custom Event to send real-time order data from your systems, you can pass the entire order payload as part of the Custom Event schema. If you'll be polling a bulk order export endpoint on your REST API instead, you can pass along an array of order payloads.
We recommend filtering for orders created since the last sync. Use a Date Utility block to generate the current timestamp, subtract your sync interval (e.g., 15 minutes), and pass this resulting timestamp to the bulk export endpoint's 'created\_at' filter to retrieve only new orders.
When building your order payload schema, you can reference the example payload below, which contains the typical fields and values that most e-commerce platforms require.
```json theme={null}
{
"orderId": "ORD-2025-001234",
"orderNumber": "1234",
"orderDate": "2025-01-15T14:30:00Z",
"status": "confirmed",
"customer": {
"id": "CUST-456789",
"email": "customer@example.com",
"firstName": "John",
"lastName": "Smith",
"phone": "+1-555-0123"
},
"billingAddress": {
"firstName": "John",
"lastName": "Smith",
"company": "Acme Corp",
"address1": "123 Main Street",
"address2": "Suite 100",
"city": "New York",
"state": "NY",
"zipCode": "10001",
"country": "US",
"phone": "+1-555-0123"
},
"shippingAddress": {
"firstName": "John",
"lastName": "Smith",
"company": "Acme Corp",
"address1": "456 Business Ave",
"address2": "",
"city": "Brooklyn",
"state": "NY",
"zipCode": "11201",
"country": "US",
"phone": "+1-555-0124"
},
"lineItems": [
{
"id": "LINE-001",
"productId": "PROD-789",
"sku": "TEE-BLK-M",
"title": "Black T-Shirt",
"variant": "Medium",
"quantity": 2,
"price": 29.99,
"totalPrice": 59.98
},
{
"id": "LINE-002",
"productId": "PROD-456",
"sku": "HAT-RED-OS",
"title": "Red Baseball Cap",
"variant": "One Size",
"quantity": 1,
"price": 24.99,
"totalPrice": 24.99
}
],
"pricing": {
"subtotal": 84.97,
"tax": 7.65,
"shipping": 9.99,
"discount": 5.00,
"total": 97.61,
"currency": "USD"
},
"shipping": {
"method": "Standard Ground",
"carrier": "UPS",
"trackingNumber": "1Z999AA1234567890",
"estimatedDelivery": "2025-01-20"
},
"payment": {
"method": "credit_card",
"status": "paid",
"transactionId": "TXN-987654321",
"gateway": "stripe"
},
"notes": "Please leave at front door",
"tags": ["online", "first-time-customer"],
"createdAt": "2025-01-15T14:30:00Z",
"updatedAt": "2025-01-15T14:45:00Z"
}
```
### 4. Check for Existing References
Before sending the order payload to your e-commerce connector, you'll want to make sure that there are valid customers, inventory items, and SKUs to reference and attach to the order.
Once you have the order payload from your systems – either single order or bulk – you'll want to perform a few lookups against the chosen e-commerce connector for each of these. The logic should work as such
1. Receive **order** payload
2. Take **customer email** or other identifying info and lookup customer via connector 'read customer' action
3. **If customer exists** move to next step **otherwise** create the customer using the info in the order payload
4. Next, perform this same process with all other entities you must reference like**inventory item** or **tax jurisdiction**
To simplify order creation, we recommend setting up separate workflows that regularly sync inventory and customer data from your target e-commerce platforms back to your system. This allows you to store platform-specific IDs locally and reference them directly in order payloads, eliminating the need for real-time lookups during order creation workflows.
Take a look at [THIS](#) Blueprint on syncing inventory, customer, and pricing data between your platform and Alloy's e-commerce connectors.
### 4A. Rebuild Order Payload with Connector Internal IDs (Optional)
If you're looking up internal IDs stored in the e-commerce platform like **Inventory Item ID** or **Customer ID** and if you feel comfortable using our [Custom Code](https://docs.runalloy.com/embedded/special-blocks/custom-code#custom-code) utility, you can actually rebuild the incoming order payload by adding item IDs into line item objects, customer IDs into the customer object, etc. This will ultimately make it easier when mapping fields into the 'create customer' action within your chosen e-commerce connector as you won't be pulling from multiple blocks, only the output of the custom code block.
### 4B. Read Global Values from Account Variables (Optional)
If you've saved certain default values within your account Variables (step 1A), the next step is to add an Account Variable node and set the action to**Read Account Variables** . This will output\_all\_ of your Account Variables, allowing you to map the correct values to the correct fields in your e-commerce connector action.
### 5. Create Order in E-Commerce Connector
Once you have all of the necessary values, objects, and reference IDs to create the order, the next step is to do so. Select your E-Commerce of choice and look for an 'Orders' – or similarly-named – dropdown in the**Connector Actions** menu. From here's you'll select the relevant 'Create Order' action and map field values from your originating order payload, customer and item lookups, and Account Variables.
 ### 6. Creating Line Items
Some E-Commerce connectors in Alloy will allow you to add line items directly within the 'Create Order' connector action. Other Connectors will require you to manually create line items\_after\_ the order is created, using a separate action. In this case you'll want to do the following:
* After the 'Create Order' action, add an [Iterate](https://docs.runalloy.com/embedded/iterate#iterate) node and pass in the 'line items' list from the original order payload as the**List to loop through** .
* Within each loop iteration, add a 'Create Order Line Item' action to capture each individual line item
* Pass the returned 'Order ID' from the 'Create Order' action into the**Order ID** field in the 'Create Order Line Item' action. This is how we associate line items created in a separate step, with the parent Order object
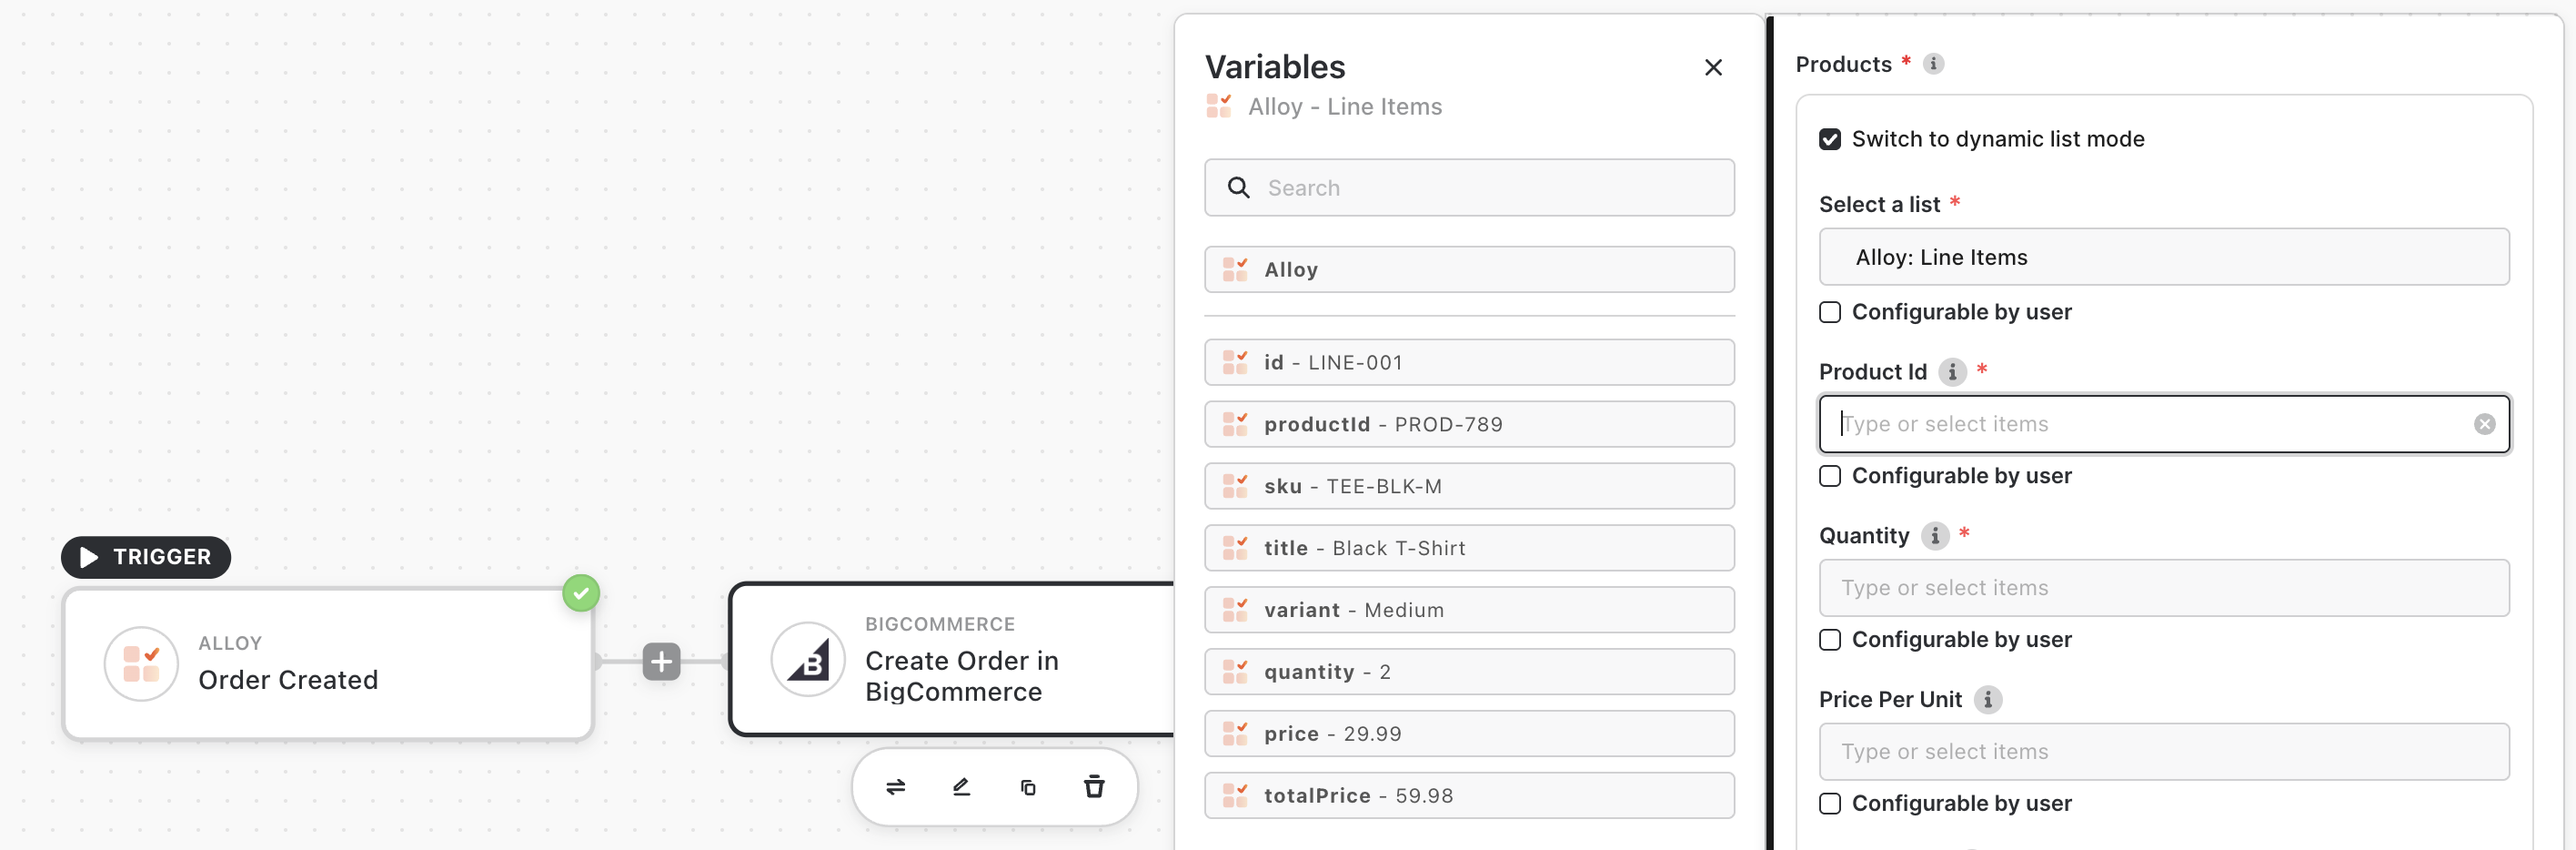
If you're able to create line items within the same action as creating an order, you can typically use**Dynamic List Mode** which allows you to pass an list directly into the action and Alloy will automatically iterate through all records in the list
### 6. Creating Line Items
Some E-Commerce connectors in Alloy will allow you to add line items directly within the 'Create Order' connector action. Other Connectors will require you to manually create line items\_after\_ the order is created, using a separate action. In this case you'll want to do the following:
* After the 'Create Order' action, add an [Iterate](https://docs.runalloy.com/embedded/iterate#iterate) node and pass in the 'line items' list from the original order payload as the**List to loop through** .
* Within each loop iteration, add a 'Create Order Line Item' action to capture each individual line item
* Pass the returned 'Order ID' from the 'Create Order' action into the**Order ID** field in the 'Create Order Line Item' action. This is how we associate line items created in a separate step, with the parent Order object
If you're able to create line items within the same action as creating an order, you can typically use**Dynamic List Mode** which allows you to pass an list directly into the action and Alloy will automatically iterate through all records in the list
 ## Video Walkthrough Library
*We've created video walkthroughs for the most common and complex integration scenarios. Choose a walkthrough below to build alongside our experts. We regularly add new videos, so check back for updates!*
## Video Walkthrough Library
*We've created video walkthroughs for the most common and complex integration scenarios. Choose a walkthrough below to build alongside our experts. We regularly add new videos, so check back for updates!*