> ## Documentation Index
> Fetch the complete documentation index at: https://docs.runalloy.com/llms.txt
> Use this file to discover all available pages before exploring further.
# Headless Mode
## Overview
Headless Mode allows you to build a fully custom interface without displaying any Alloy-branded components. This gives you complete control over the end-to-end user experience while leveraging our integration infrastructure behind the scenes.
## Getting Started
A typical Headless Mode user flow looks like this:
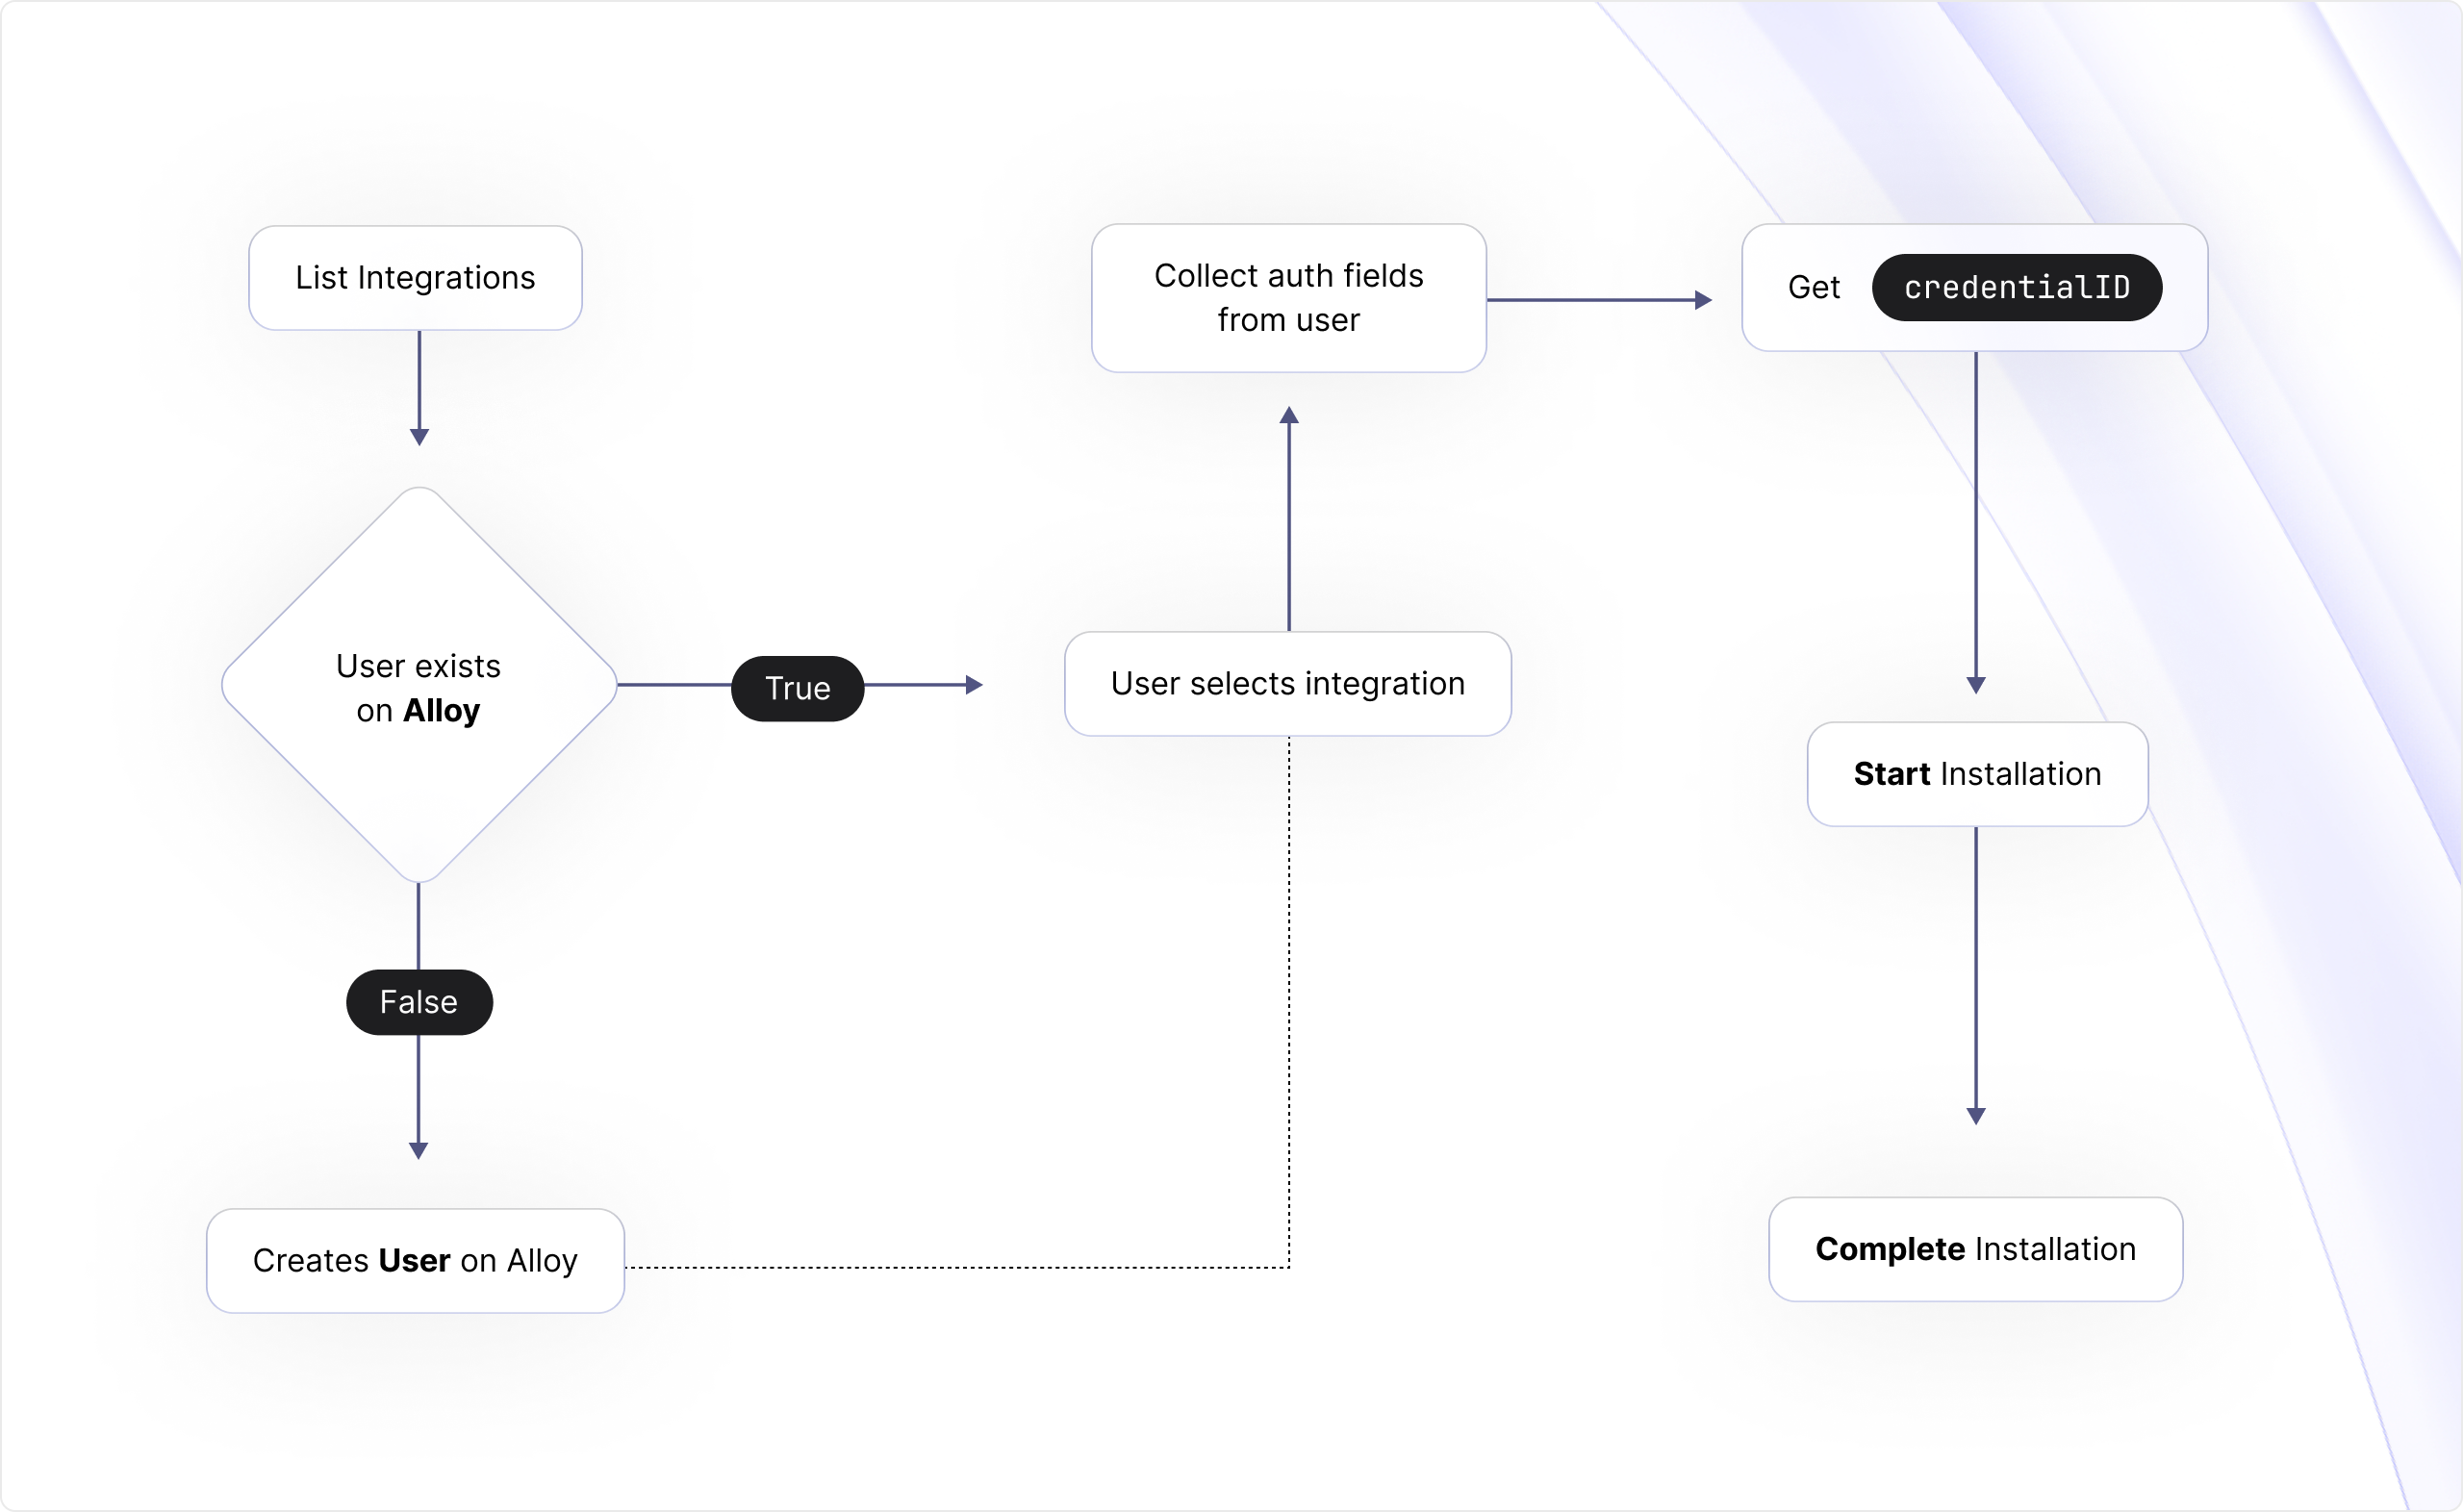 Let's explore each step in detail.
### Create a User
First, create a user by calling the `/users` endpoint:
```bash cURL theme={null}
curl --request POST \
--url https://embedded.runalloy.com/users \
--header 'Authorization: YOUR_BEARER_KEY' \
--header 'accept: application/json'
```
**Sample Response**
```json JSON theme={null}
{
"userId": "6634f9aa6adb117b4c47d8ab"
}
```
This returns a `userId` for the newly created user.
### List Integrations
To [list your available integrations](/reference/embedded/list-integrations), use any `userId` or `username` you've previously created:
```bash cURL theme={null}
curl --request GET \
--url https://embedded.runalloy.com/integrations?userId=ANY_USER_ID \
--header 'Authorization: YOUR_BEARER_KEY' \
--header 'accept: application/json'
```
### Display and Collect Auth Fields
Once your user selects an integration to connect, you'll need to display the authentication fields required by that third-party app. To determine which fields to show, make a request to the `metadata/credentials` endpoint. Replace `APP_NAME` with the name of the selected integration (e.g., Shopify):
```bash cURL" theme={null}
curl --request GET \
--url https://embedded.runalloy.com/metadata/credentials/APP_NAME \
--header 'Authorization: YOUR_BEARER_KEY' \
--header 'accept: application/json'
```
The `APP_NAME` can be found in the response from the [List integrations](/embedded/headless-mode#list-integrations) endpoint.
**Sample Response**
Here's a sample response for Shopify:
```json JSON" theme={null}
{
"data": {
"name": "shopify",
"icon": "https://cdn.runalloy.com/icons/shopify.png",
"isOauth": true,
"properties": [
{
"name": "shopSubdomain",
"displayName": "Shop Subdomain",
"description": "Enter your store subdomain. If your store domain is example.myshopify.com, the subdomain would be example."
}
]
}
}
```
From this response, you can see that Shopify uses OAuth authentication (`isOauth: true`) and requires one auth field: **Shop subdomain**. Display this field in your interface:
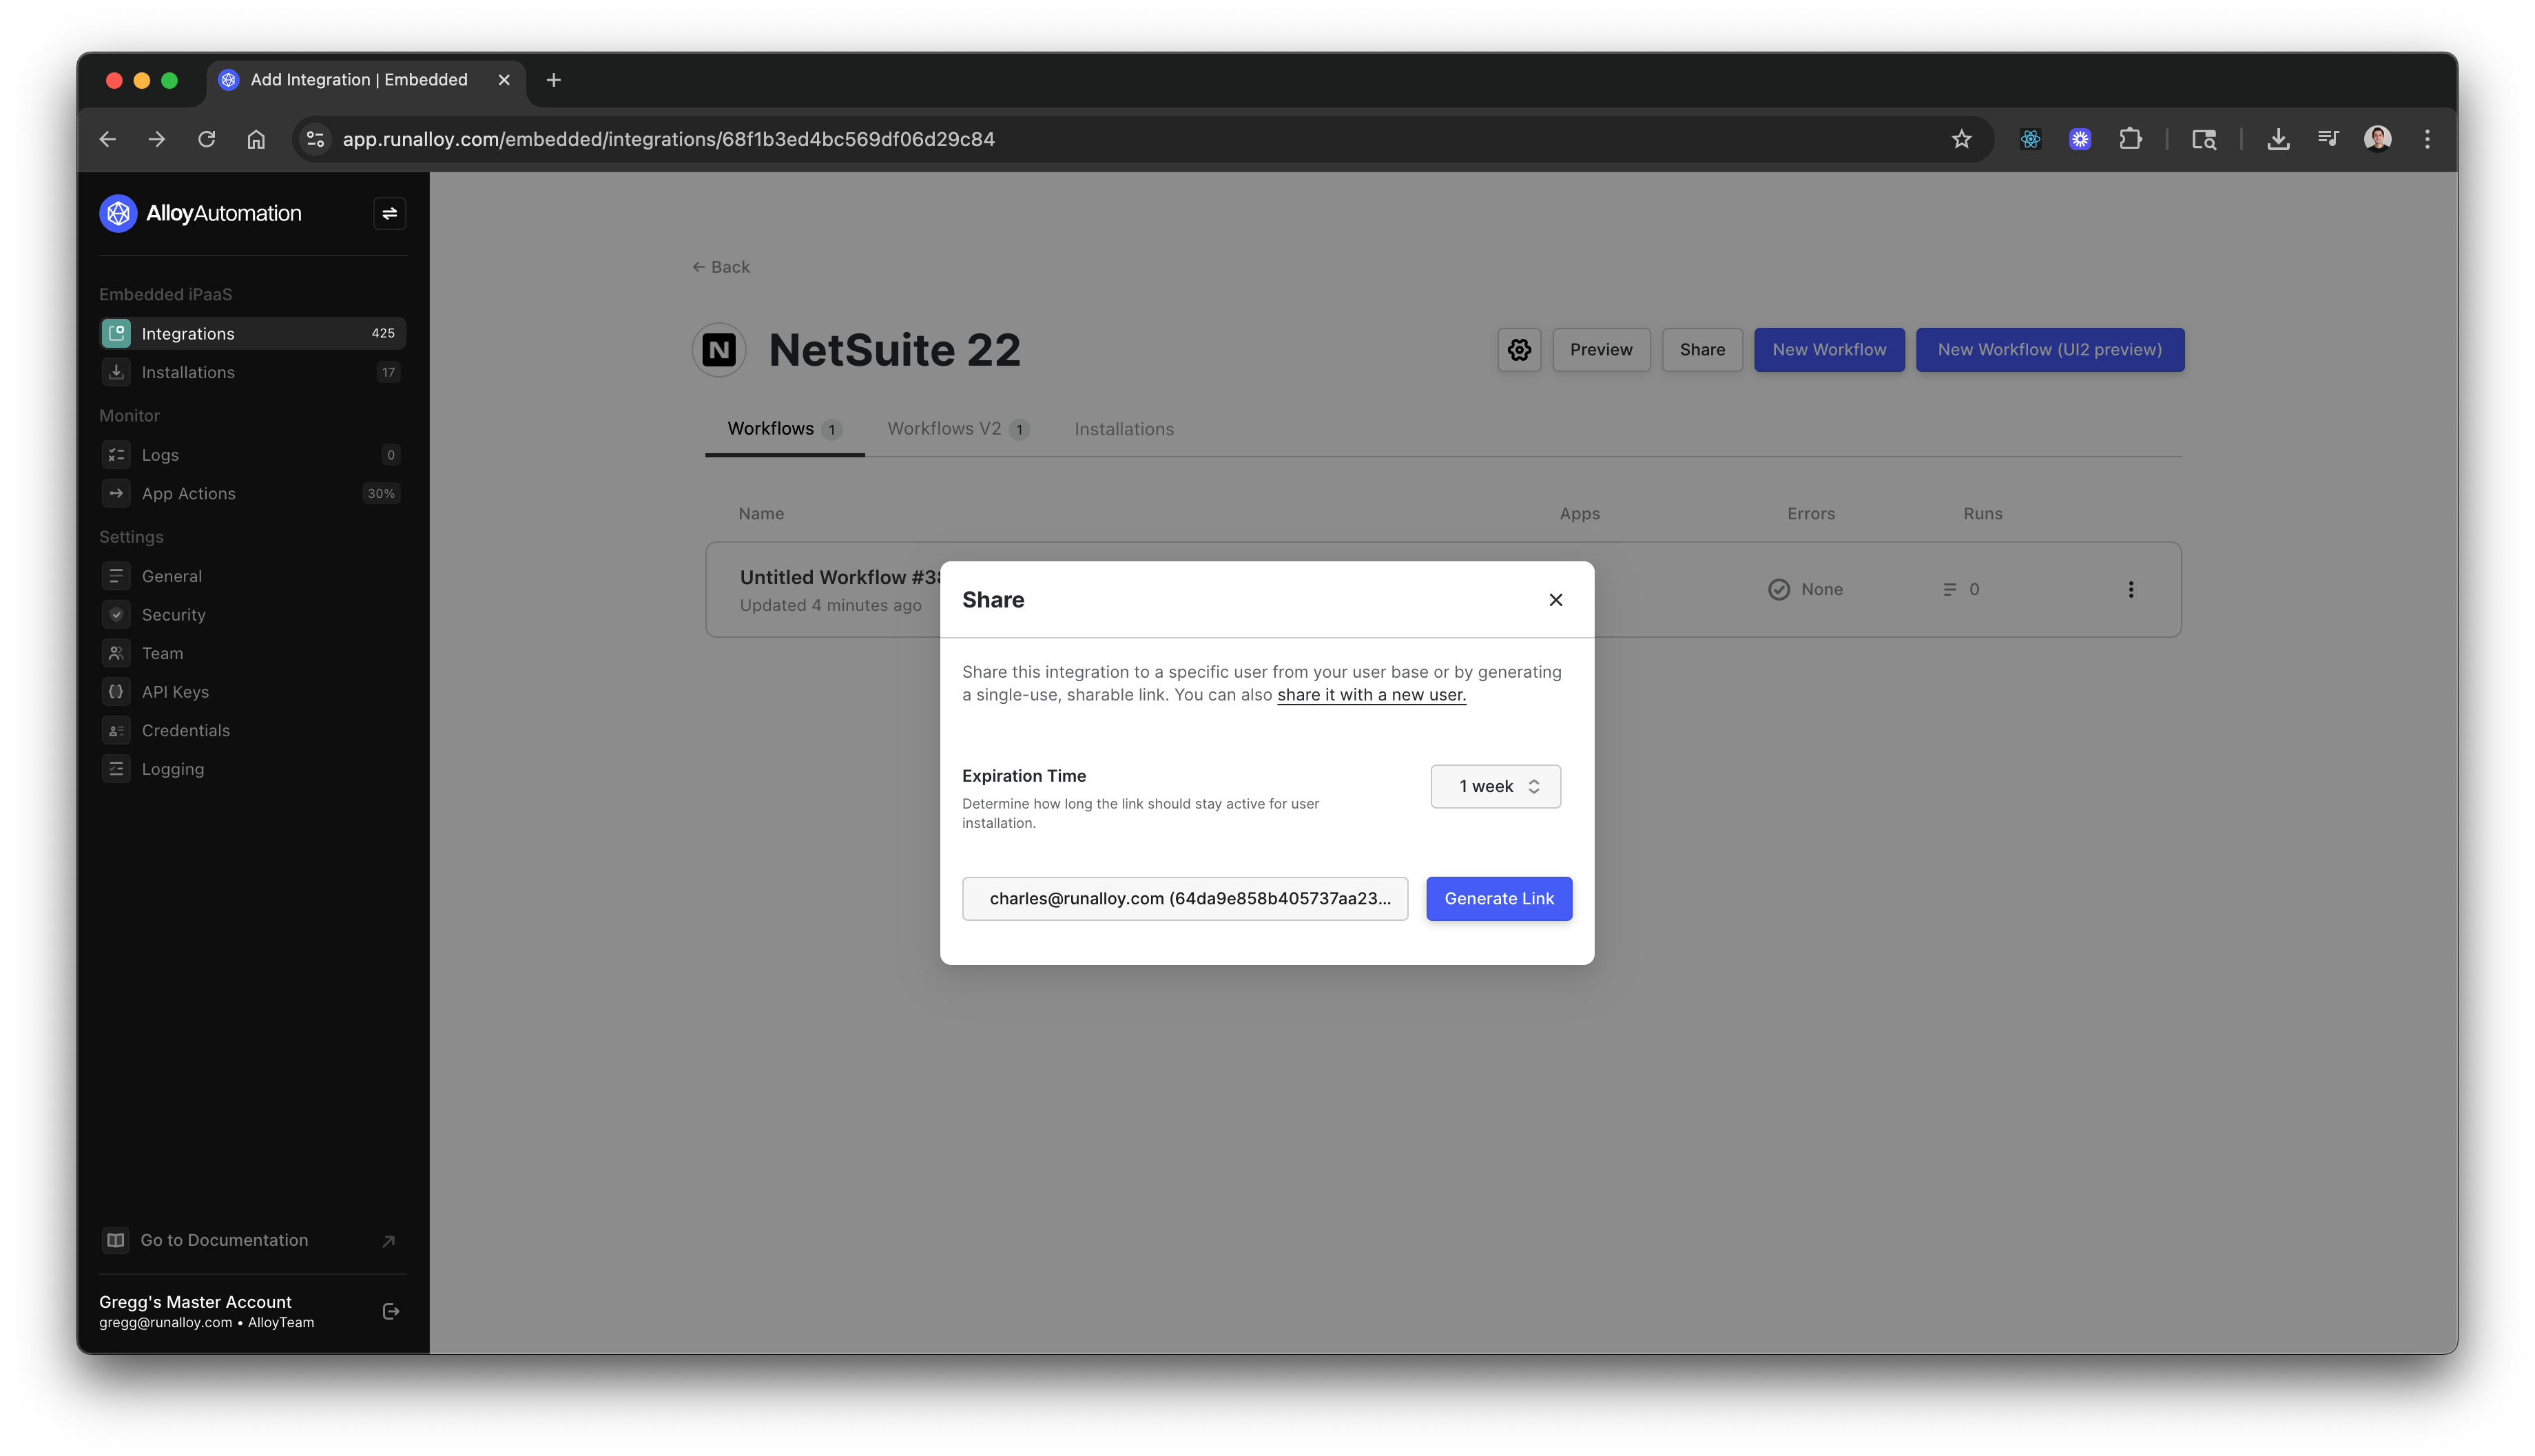
Once the user enters the required auth field(s), proceed to obtain a `credentialId`.
## Getting a CredentialId
A `credentialId` allows your app to perform actions like reading and writing data on behalf of the end-user once authenticated.
Typically, authentication is handled via the [Alloy Modal](/embedded/modal/modal-sdk). But to leverage a truly headless experience, you can ditch the modal completely. This is where our programmatic credential endpoints come in.
First, you'll need to determine if the third-party app uses OAuth or non-OAuth for authentication. See the [Display and Collect Auth fields](/embedded/headless-mode#display-and-collect-auth-fields) section for more.
### Custom OAuth (Optional)
When using Headless Mode, users will see the **Alloy Automation is requesting access to...** screen on the third-party app. To display your branding instead, you'll need approval from the third-party app. Read [this tutorial](/embedded/handling-custom-oauth) to learn more about using Custom OAuth with Headless Mode.
### Getting a CredentialId for OAuth Apps
If the third-party app uses OAuth, follow these steps:
[Collect](/embedded/headless-mode#display-and-collect-auth-fields) the required auth fields from the user.
Obtain an `oauthURL` by calling the **GET headless/oauthUrl** endpoint, passing the values from Step 1 as parameters. This endpoint always requires `userId` and `app` as the first two parameters, with additional auth fields appended as needed.
Here's an example using Shopify:
**Sample Request**
```bash cURL theme={null}
curl --request GET \
--url https://embedded.runalloy.com/headless/oauthUrl?userId=&app=shopify&shopSubdomain=YOUR_SHOPIFY_SHOP_SUBDOMAIN \
--header 'Authorization: YOUR_BEARER_KEY' \
--header 'accept: application/json'
```
**Sample Response**
```json JSON theme={null}
{
"data": {
"oauthUrl": "https://api.runalloy.com/api/strategy/shopify/authorize?userId=YOUR_USER_ID&shopSubdomain=YOUR_SHOPIFY_SHOP_SUBDOMAIN"
}
}
```
Redirect the user to the third-party app using the `oauthURL` from Step 2. This allows them to grant permissions to your app via OAuth.
Once the user grants permission, a `credentialId` is created. You'll use this to make future requests on behalf of the user.
To retrieve a user's `credentialId`, make a request to the [List User Credentials](/reference/embedded/list-user-credentials) endpoint:
```bash cURL theme={null}
curl --request GET \
--url https://embedded.runalloy.com/users/USER_ID/credentials \
--header 'Authorization: bearer YOUR_API_KEY' \
--header 'accept: application/json'
```
### Getting a CredentialId for non-OAuth Apps
To create a non-OAuth credential (such as NetSuite), use the **POST Create API Key Credential** endpoint:
**Sample Request**
```bash cURL theme={null}
curl --request POST \
--url https://embedded.runalloy.com/headless/credentials \
--header 'Content-Type: application/json' \
--header 'Authorization: Bearer YOUR_API_KEY' \
--data {
"userId": "YOUR_USER_ID",
"credential": {
"type": "netsuite",
"data": {
"realm": "123",
"consumerKey": "4567",
"consumerSecret": "6789",
"tokenId": "0000",
"tokenSecret": "11111"
}
}
}
```
Replace `realm`, `consumerKey`, `consumerSecret`, `tokenId`, and `tokenSecret` with the user's input values.
**Sample Response**
```json JSON theme={null}
{
"success": true,
"credentialId": "65b6fd48e4142dd86c387f5e"
}
```
## Start Installation
Now you can create an installation, which establishes a connection instance between your app and the third-party app. Make a request to the **POST headless/startinstallation** endpoint:
```bash cURL theme={null}
curl --request POST \
--url https://embedded.runalloy.com/headless/startinstallation \
--header 'Authorization: bearer YOUR_API_KEY' \
--header 'accept: application/json'
--data {
"userId": "YOUR_USER_ID",
"credentialId": "YOUR_CREDENTIAL_ID",
"integrationId": "YOUR_INTEGRATION_ID"
```
This endpoint returns an `installationId` that you'll need to store for [completing the installation](/embedded/headless-mode#completing-the-installation).
### How to find your integrationId
Navigate to Alloy > Integrations > SELECT INTEGRATION (e.g., NetSuite). In your browser's address bar, you'll see a URL like **..../integrations/661e92e38eb4d42f032be2d0**. Copy the string starting with **66**—this is your `integrationId` for that integration.
## User-defined Data Mappings
Skip to [Completing the installation](/embedded/headless-mode#completing-the-installation) if your integration doesn't require user-defined data mappings.
Some integrations may require end users to map values to the third-party app, as explained in [this article](/embedded/end-user-configuration).
For example, if your integration sends messages to a Slack channel, end users need to specify the channel and message content. You can mark these fields as **Configurable by user** in the workflow builder:
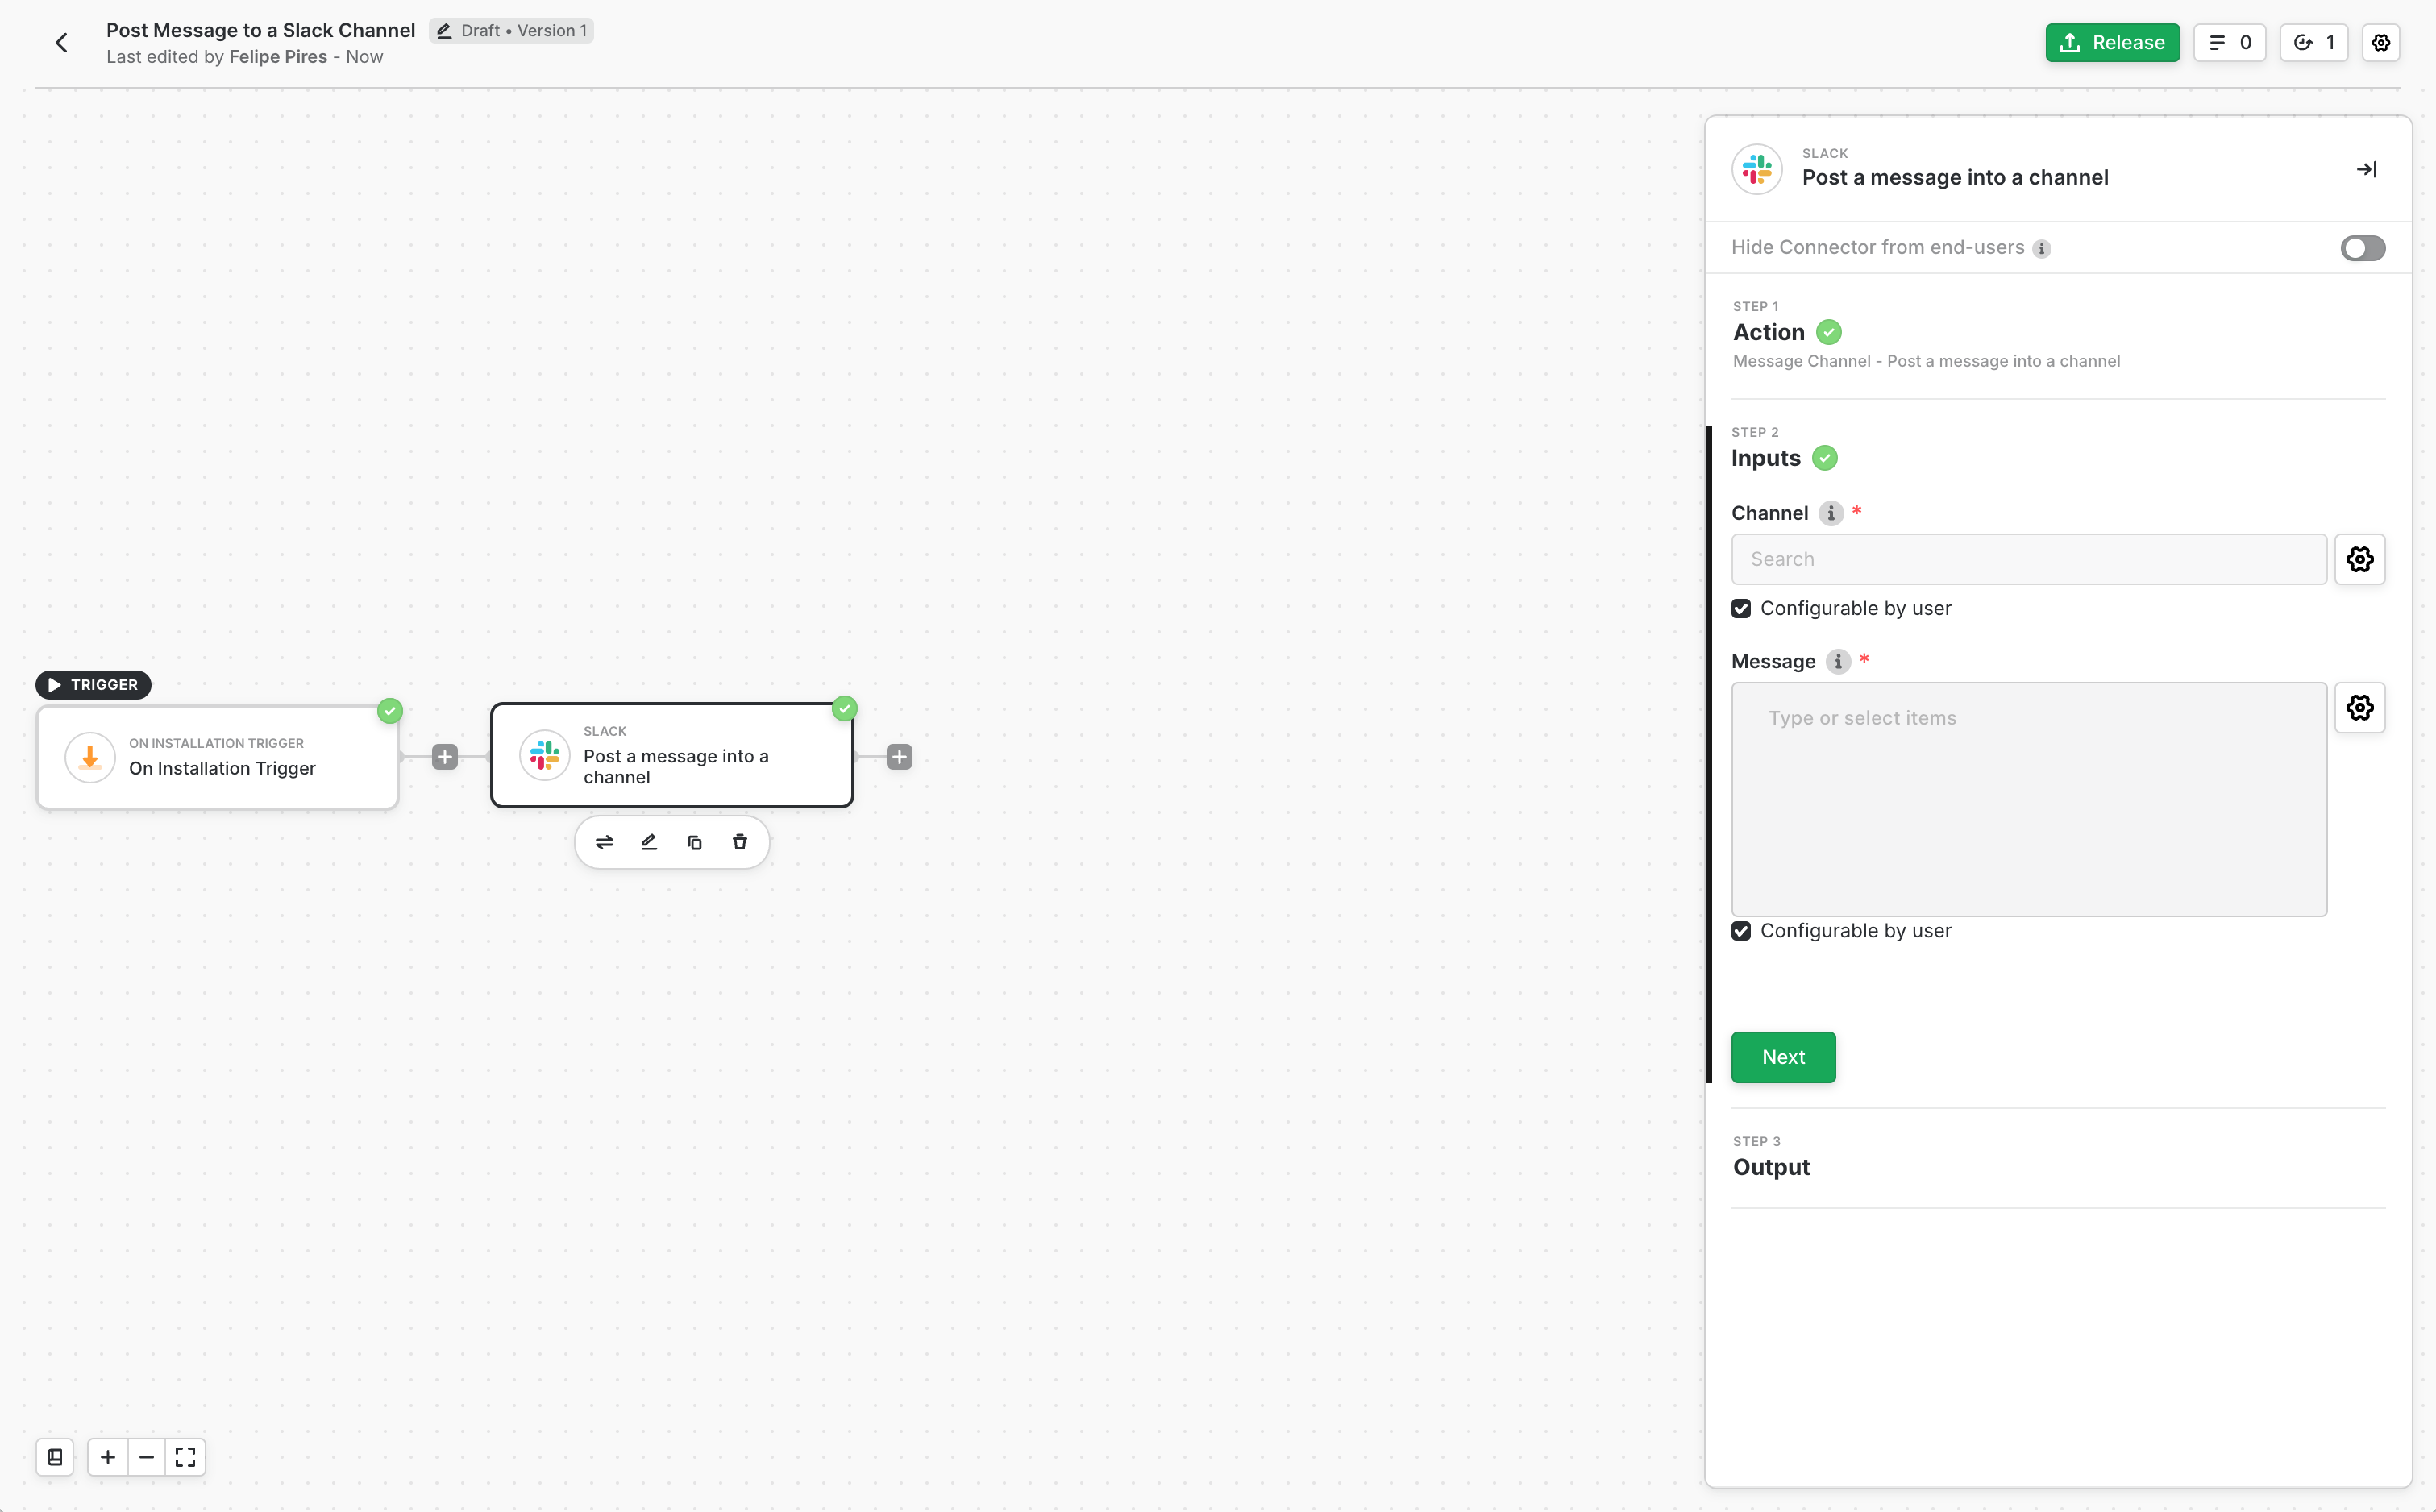
To collect these mappings in Headless Mode, use the **POST headless/startInstallation** endpoint.
**Sample Request**
```bash cURL theme={null}
curl --location 'https://embedded.runalloy.com/headless/startInstallation' \
--header 'Content-Type: application/json' \
--header 'Authorization: Bearer YOUR_API_KEY' \
--data '{
"userId":"YOUR_USER_ID",
"credentialIds":["YOUR_CREDENTIAL_ID"],
"integrationId":"YOUR_INTEGRATION_ID"
}'
```
**Sample Response**
This endpoint creates an installation referenced by its `installationId`. The `fields` array returns the fields to display to your end user along with their data types:
```json JSON theme={null}
{
"data": [
{
"workflowId": "65b7005ae9761102a64ddd3b",
"app": "netsuite",
"blockId": "3a8a8e50-f0e5-488b-9b7b-53656e93d392",
"fields": [
{
"name": "customerEmail",
"displayName": "Customer's Email",
"type": "string",
"required": true
}
]
}
],
"installationId": "65b701c2f5ba66db3bc53a68"
}
```
## Completing the Installation
After creating the installation and collecting user data mappings, pass that data back to the system using the **POST Complete Headless Installation** endpoint. If your integration doesn't require user input, leave the `data` field empty.
**Sample Request**
```bash cURL theme={null}
curl --location 'https://embedded.runalloy.com/headless/completeInstallation' \
--header 'Content-Type: application/json' \
--header 'Authorization: Bearer YOUR_API_KEY' \
--data-raw '{
"installationId": "YOUR_INSTALLATION_ID",
"data": [
{
"workflowId": "YOUR_WORKFLOW_ID",
"blockId": "YOUR_BLOCK_ID",
"fields": [
{ "name": "customerEmail", "value": "abc@123.com" }
]
}
]
}
'
```
**Sample Response**
```json JSON theme={null}
{
"message": "Installation completed successfully"
}
```
You can verify the installation by navigating to Alloy Dashboard > Embedded iPaaS > Integrations > YOUR\_INTEGRATION > Installations.
## Summary
Headless Mode provides a fully whitelabeled integration experience. Your end users can connect third-party apps through your custom interface without ever knowing you're using our platform.
Let's explore each step in detail.
### Create a User
First, create a user by calling the `/users` endpoint:
```bash cURL theme={null}
curl --request POST \
--url https://embedded.runalloy.com/users \
--header 'Authorization: YOUR_BEARER_KEY' \
--header 'accept: application/json'
```
**Sample Response**
```json JSON theme={null}
{
"userId": "6634f9aa6adb117b4c47d8ab"
}
```
This returns a `userId` for the newly created user.
### List Integrations
To [list your available integrations](/reference/embedded/list-integrations), use any `userId` or `username` you've previously created:
```bash cURL theme={null}
curl --request GET \
--url https://embedded.runalloy.com/integrations?userId=ANY_USER_ID \
--header 'Authorization: YOUR_BEARER_KEY' \
--header 'accept: application/json'
```
### Display and Collect Auth Fields
Once your user selects an integration to connect, you'll need to display the authentication fields required by that third-party app. To determine which fields to show, make a request to the `metadata/credentials` endpoint. Replace `APP_NAME` with the name of the selected integration (e.g., Shopify):
```bash cURL" theme={null}
curl --request GET \
--url https://embedded.runalloy.com/metadata/credentials/APP_NAME \
--header 'Authorization: YOUR_BEARER_KEY' \
--header 'accept: application/json'
```
The `APP_NAME` can be found in the response from the [List integrations](/embedded/headless-mode#list-integrations) endpoint.
**Sample Response**
Here's a sample response for Shopify:
```json JSON" theme={null}
{
"data": {
"name": "shopify",
"icon": "https://cdn.runalloy.com/icons/shopify.png",
"isOauth": true,
"properties": [
{
"name": "shopSubdomain",
"displayName": "Shop Subdomain",
"description": "Enter your store subdomain. If your store domain is example.myshopify.com, the subdomain would be example."
}
]
}
}
```
From this response, you can see that Shopify uses OAuth authentication (`isOauth: true`) and requires one auth field: **Shop subdomain**. Display this field in your interface:

Once the user enters the required auth field(s), proceed to obtain a `credentialId`.
## Getting a CredentialId
A `credentialId` allows your app to perform actions like reading and writing data on behalf of the end-user once authenticated.
Typically, authentication is handled via the [Alloy Modal](/embedded/modal/modal-sdk). But to leverage a truly headless experience, you can ditch the modal completely. This is where our programmatic credential endpoints come in.
First, you'll need to determine if the third-party app uses OAuth or non-OAuth for authentication. See the [Display and Collect Auth fields](/embedded/headless-mode#display-and-collect-auth-fields) section for more.
### Custom OAuth (Optional)
When using Headless Mode, users will see the **Alloy Automation is requesting access to...** screen on the third-party app. To display your branding instead, you'll need approval from the third-party app. Read [this tutorial](/embedded/handling-custom-oauth) to learn more about using Custom OAuth with Headless Mode.
### Getting a CredentialId for OAuth Apps
If the third-party app uses OAuth, follow these steps:
[Collect](/embedded/headless-mode#display-and-collect-auth-fields) the required auth fields from the user.
Obtain an `oauthURL` by calling the **GET headless/oauthUrl** endpoint, passing the values from Step 1 as parameters. This endpoint always requires `userId` and `app` as the first two parameters, with additional auth fields appended as needed.
Here's an example using Shopify:
**Sample Request**
```bash cURL theme={null}
curl --request GET \
--url https://embedded.runalloy.com/headless/oauthUrl?userId=&app=shopify&shopSubdomain=YOUR_SHOPIFY_SHOP_SUBDOMAIN \
--header 'Authorization: YOUR_BEARER_KEY' \
--header 'accept: application/json'
```
**Sample Response**
```json JSON theme={null}
{
"data": {
"oauthUrl": "https://api.runalloy.com/api/strategy/shopify/authorize?userId=YOUR_USER_ID&shopSubdomain=YOUR_SHOPIFY_SHOP_SUBDOMAIN"
}
}
```
Redirect the user to the third-party app using the `oauthURL` from Step 2. This allows them to grant permissions to your app via OAuth.
Once the user grants permission, a `credentialId` is created. You'll use this to make future requests on behalf of the user.
To retrieve a user's `credentialId`, make a request to the [List User Credentials](/reference/embedded/list-user-credentials) endpoint:
```bash cURL theme={null}
curl --request GET \
--url https://embedded.runalloy.com/users/USER_ID/credentials \
--header 'Authorization: bearer YOUR_API_KEY' \
--header 'accept: application/json'
```
### Getting a CredentialId for non-OAuth Apps
To create a non-OAuth credential (such as NetSuite), use the **POST Create API Key Credential** endpoint:
**Sample Request**
```bash cURL theme={null}
curl --request POST \
--url https://embedded.runalloy.com/headless/credentials \
--header 'Content-Type: application/json' \
--header 'Authorization: Bearer YOUR_API_KEY' \
--data {
"userId": "YOUR_USER_ID",
"credential": {
"type": "netsuite",
"data": {
"realm": "123",
"consumerKey": "4567",
"consumerSecret": "6789",
"tokenId": "0000",
"tokenSecret": "11111"
}
}
}
```
Replace `realm`, `consumerKey`, `consumerSecret`, `tokenId`, and `tokenSecret` with the user's input values.
**Sample Response**
```json JSON theme={null}
{
"success": true,
"credentialId": "65b6fd48e4142dd86c387f5e"
}
```
## Start Installation
Now you can create an installation, which establishes a connection instance between your app and the third-party app. Make a request to the **POST headless/startinstallation** endpoint:
```bash cURL theme={null}
curl --request POST \
--url https://embedded.runalloy.com/headless/startinstallation \
--header 'Authorization: bearer YOUR_API_KEY' \
--header 'accept: application/json'
--data {
"userId": "YOUR_USER_ID",
"credentialId": "YOUR_CREDENTIAL_ID",
"integrationId": "YOUR_INTEGRATION_ID"
```
This endpoint returns an `installationId` that you'll need to store for [completing the installation](/embedded/headless-mode#completing-the-installation).
### How to find your integrationId
Navigate to Alloy > Integrations > SELECT INTEGRATION (e.g., NetSuite). In your browser's address bar, you'll see a URL like **..../integrations/661e92e38eb4d42f032be2d0**. Copy the string starting with **66**—this is your `integrationId` for that integration.
## User-defined Data Mappings
Skip to [Completing the installation](/embedded/headless-mode#completing-the-installation) if your integration doesn't require user-defined data mappings.
Some integrations may require end users to map values to the third-party app, as explained in [this article](/embedded/end-user-configuration).
For example, if your integration sends messages to a Slack channel, end users need to specify the channel and message content. You can mark these fields as **Configurable by user** in the workflow builder:

To collect these mappings in Headless Mode, use the **POST headless/startInstallation** endpoint.
**Sample Request**
```bash cURL theme={null}
curl --location 'https://embedded.runalloy.com/headless/startInstallation' \
--header 'Content-Type: application/json' \
--header 'Authorization: Bearer YOUR_API_KEY' \
--data '{
"userId":"YOUR_USER_ID",
"credentialIds":["YOUR_CREDENTIAL_ID"],
"integrationId":"YOUR_INTEGRATION_ID"
}'
```
**Sample Response**
This endpoint creates an installation referenced by its `installationId`. The `fields` array returns the fields to display to your end user along with their data types:
```json JSON theme={null}
{
"data": [
{
"workflowId": "65b7005ae9761102a64ddd3b",
"app": "netsuite",
"blockId": "3a8a8e50-f0e5-488b-9b7b-53656e93d392",
"fields": [
{
"name": "customerEmail",
"displayName": "Customer's Email",
"type": "string",
"required": true
}
]
}
],
"installationId": "65b701c2f5ba66db3bc53a68"
}
```
## Completing the Installation
After creating the installation and collecting user data mappings, pass that data back to the system using the **POST Complete Headless Installation** endpoint. If your integration doesn't require user input, leave the `data` field empty.
**Sample Request**
```bash cURL theme={null}
curl --location 'https://embedded.runalloy.com/headless/completeInstallation' \
--header 'Content-Type: application/json' \
--header 'Authorization: Bearer YOUR_API_KEY' \
--data-raw '{
"installationId": "YOUR_INSTALLATION_ID",
"data": [
{
"workflowId": "YOUR_WORKFLOW_ID",
"blockId": "YOUR_BLOCK_ID",
"fields": [
{ "name": "customerEmail", "value": "abc@123.com" }
]
}
]
}
'
```
**Sample Response**
```json JSON theme={null}
{
"message": "Installation completed successfully"
}
```
You can verify the installation by navigating to Alloy Dashboard > Embedded iPaaS > Integrations > YOUR\_INTEGRATION > Installations.
## Summary
Headless Mode provides a fully whitelabeled integration experience. Your end users can connect third-party apps through your custom interface without ever knowing you're using our platform.