Embedded Quick Start
Introduction
Welcome! We’re thrilled you’ve chosen to build integrations with Alloy Embedded. Alloy Embedded is the easiest and fastest way to go live with not just one but hundreds of pre-built, maintained, and easy to use integrations. Today, customers use various applications to run their commerce operations and they expect to buy software that integrates seamlessly with other tools. Providing third-party integrations has become an essential part of building your SaaS Application. However, building and maintaining a robust integration requires a lot of engineering resources and takes significant time away from your product roadmap.
Enter Alloy Embedded.
Alloy Embedded is a white-label integration solution that enables commerce companies to build native integration experiences in a short amount of time, giving you time back to focus on the most important thing for your business: your product. Let us handle the complexity of managing integrations – just implement our SDK once and build integrations with ease!
In this Quick Start guide, you'll learn how to create comprehensive integrations with the Alloy Embedded platform. We’ll cover the following topics:
- Key Concepts
- How to build an integration
- How to add Alloy Embedded to your application
- Go live!
Grab a cup of coffee and let’s dive in.
Key Concepts
First things first, let’s talk about key concepts. Since we’re about to throw a lot at you in this tutorial, we think it’s best to take a step back and align on a handful of key terms first.
Feel free to check out our handy terminology section for more details.
-
ISV: We refer to you, the Embedded client, as the Independent Software Vendor. The ISV determines what integrations to show to their application’s users.
-
User: We refer to your application’s users as users or end users. Users authenticate their credentials and choose which integrations to install. Users interact with your platform and connect their integrations using the Alloy Embedded modal behind the scenes.
-
Integrations: An integration is a combination of workflows centered around a single service. For example, you could build a Shopify integration that has 3 workflows: the first workflow sends order data every time a Shopify order is placed to your data warehouse, the second workflow sends customer data every time a new customer signs up in a Shopify store to your data warehouse and the third workflow tags a customer when a user clicks a button on your site.
-
Workflows: Workflows define exactly what should happen when any given event occurs. A workflow consists of a trigger and action block. A trigger block represents the initial event that fires off the workflow. Similarly, an action block defines where the data from the trigger block should be routed to (example: if you have a workflow that says “Create a new contact in NetSuite every time a customer signs up for my platform” then the trigger would be when a customer signs up for your platform and the action block would be the NetSuite block). We’ll dive deeper into this in a bit.
-
Embedded Modal: Often referred to as just the “modal”, the Embedded Modal is part of our Frontend JavaScript SDK and is used to collect the details from users needed to setup and configure an integration (example below).
Behind the scenes, your integration is comprised of "parent" workflows. These parent workflows are the templates you define when you build the workflows in the Embedded Workflow Editor (something we’ll do later on in this guide).
You can think of a parent workflow like a class in programming. A parent workflow defines the general structure of the workflow – emphasis on structure. Just like defining a class in programming isn't the end of the story, creating a parent workflow is only the first step when it comes to implementing Embedded. In order to test out your workflows, you need to instantiate your parent workflow – this is where child workflows come in.
You can think of child workflows like instances of the parent workflow. Since every user might have a slight modification (e.g. users will have their own stores and credentials) the child workflow specifies a unique workflow configuration. That way, when we run the workflow, it runs exactly what you tell it to, specific to the individual merchant. If you’re still a bit hazy on how this all works, hang in there. We’ll take a look at a practical example in a moment.
Alloy Embedded handles all the instantiations and abstracts away parent and child workflows. All you have to do is keep track of a single
workflowIdand we'll do the heavy lifting.
Defining our Integration
With this in mind, let's assume we want to build a BigCommerce integration. Our integration will be comprised of two distinct workflows as seen below:
Workflow #1
Create an internal order for each new BigCommerce order
Workflow #2
When a customer signs up for my platform, create a customer record in BigCommerce*
As you can see, these two workflows share a common integration: BigCommerce.
Step 1: Building the Integration
Now that you understand our key terms, it’s time to jump in and start building your first integration with Alloy Embedded. Before we get into any coding, let’s first take a look at how to build an example integration on Alloy Embedded’s workflow builder.
In this section, we will aim to create an integration between BigCommerce and your application. The purpose of our integration will be to sync customer data back and forth (note: a bi-directional data sync is among our most common use cases).
In this example, let’s say your application is a fulfillment management tool for users (for the sake of brevity we’ll call you “Fulfillmently” – I know, I know terrible name). We will show you how to create two simple workflows for this case:
- When a new order is created in BigCommerce, create a new task in Fulfillmently
- When a fulfillment status is updated in Fulfillmently, update the order status in BigCommerce
Naturally, you would probably create more workflows for BigCommerce to cover your use cases, but for the time being, we will use these two examples to get you started.
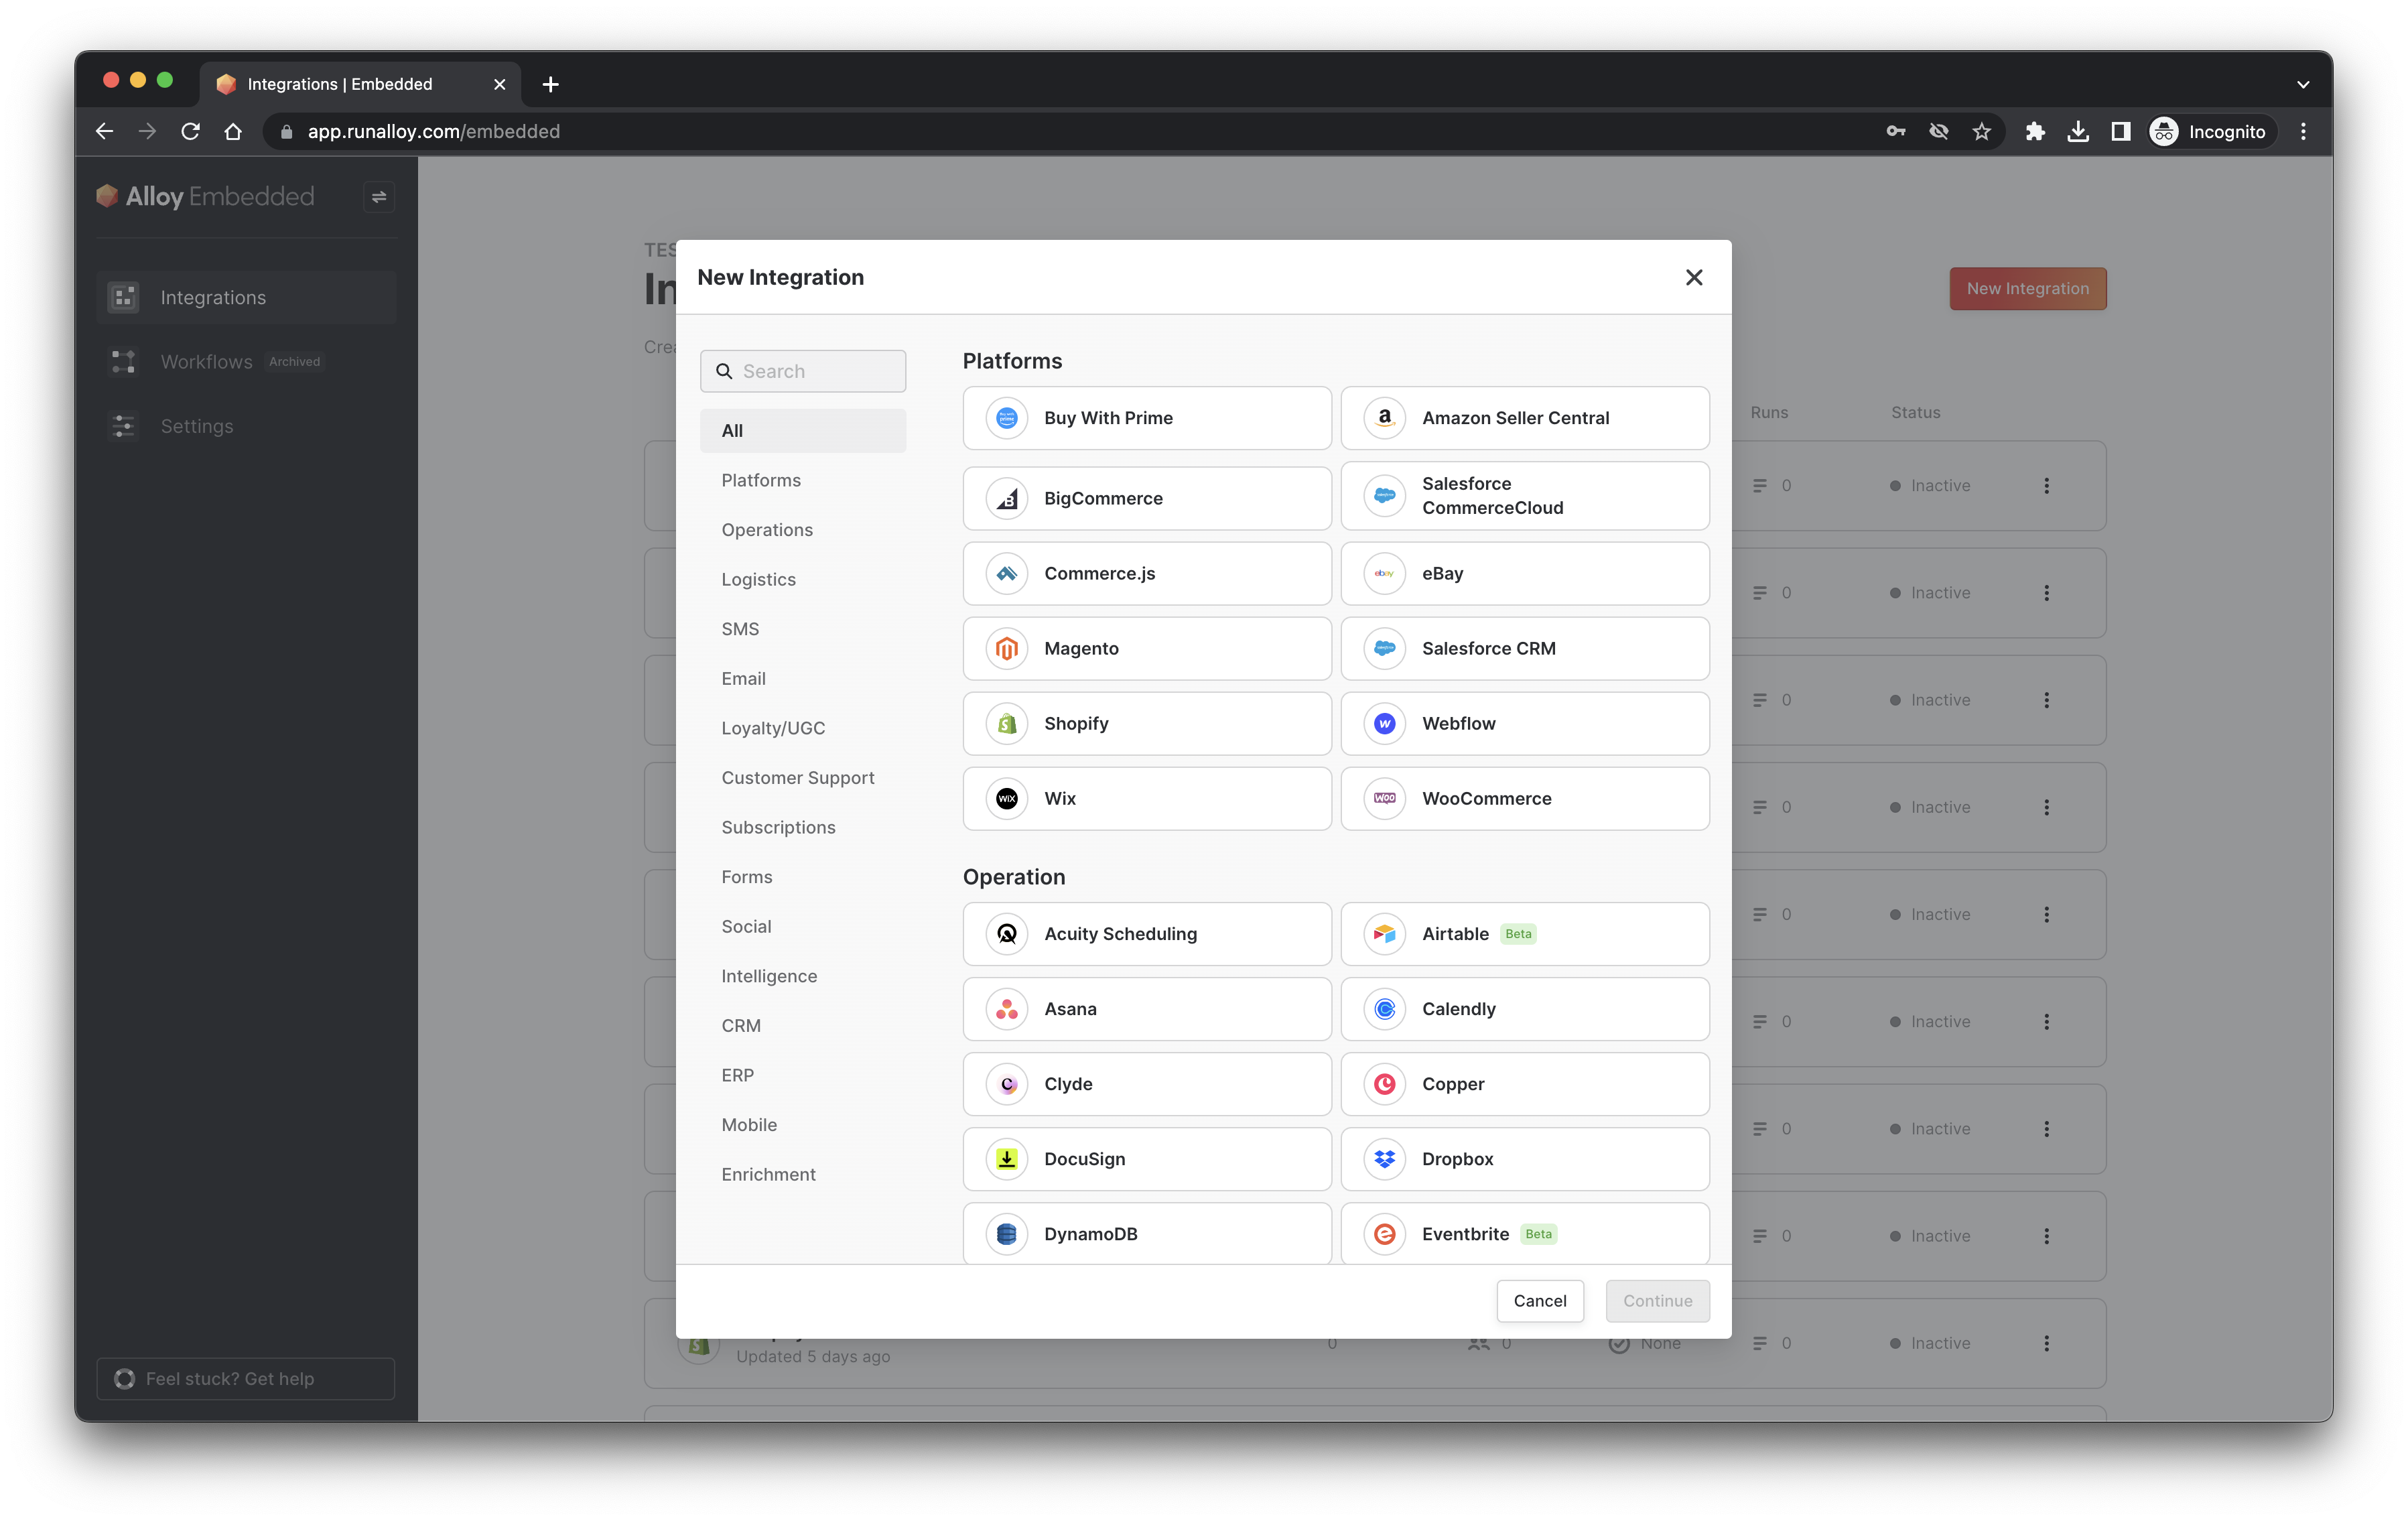
Select the Integration
To get started, navigate to the Alloy Embedded dashboard and select BigCommerce as the integration you want to build.
The First Workflow: BigCommerce → Your App
Now that you've selected your first integration to build, we’re just about ready to get going. To create a workflow inside your integration, click New Workflow.
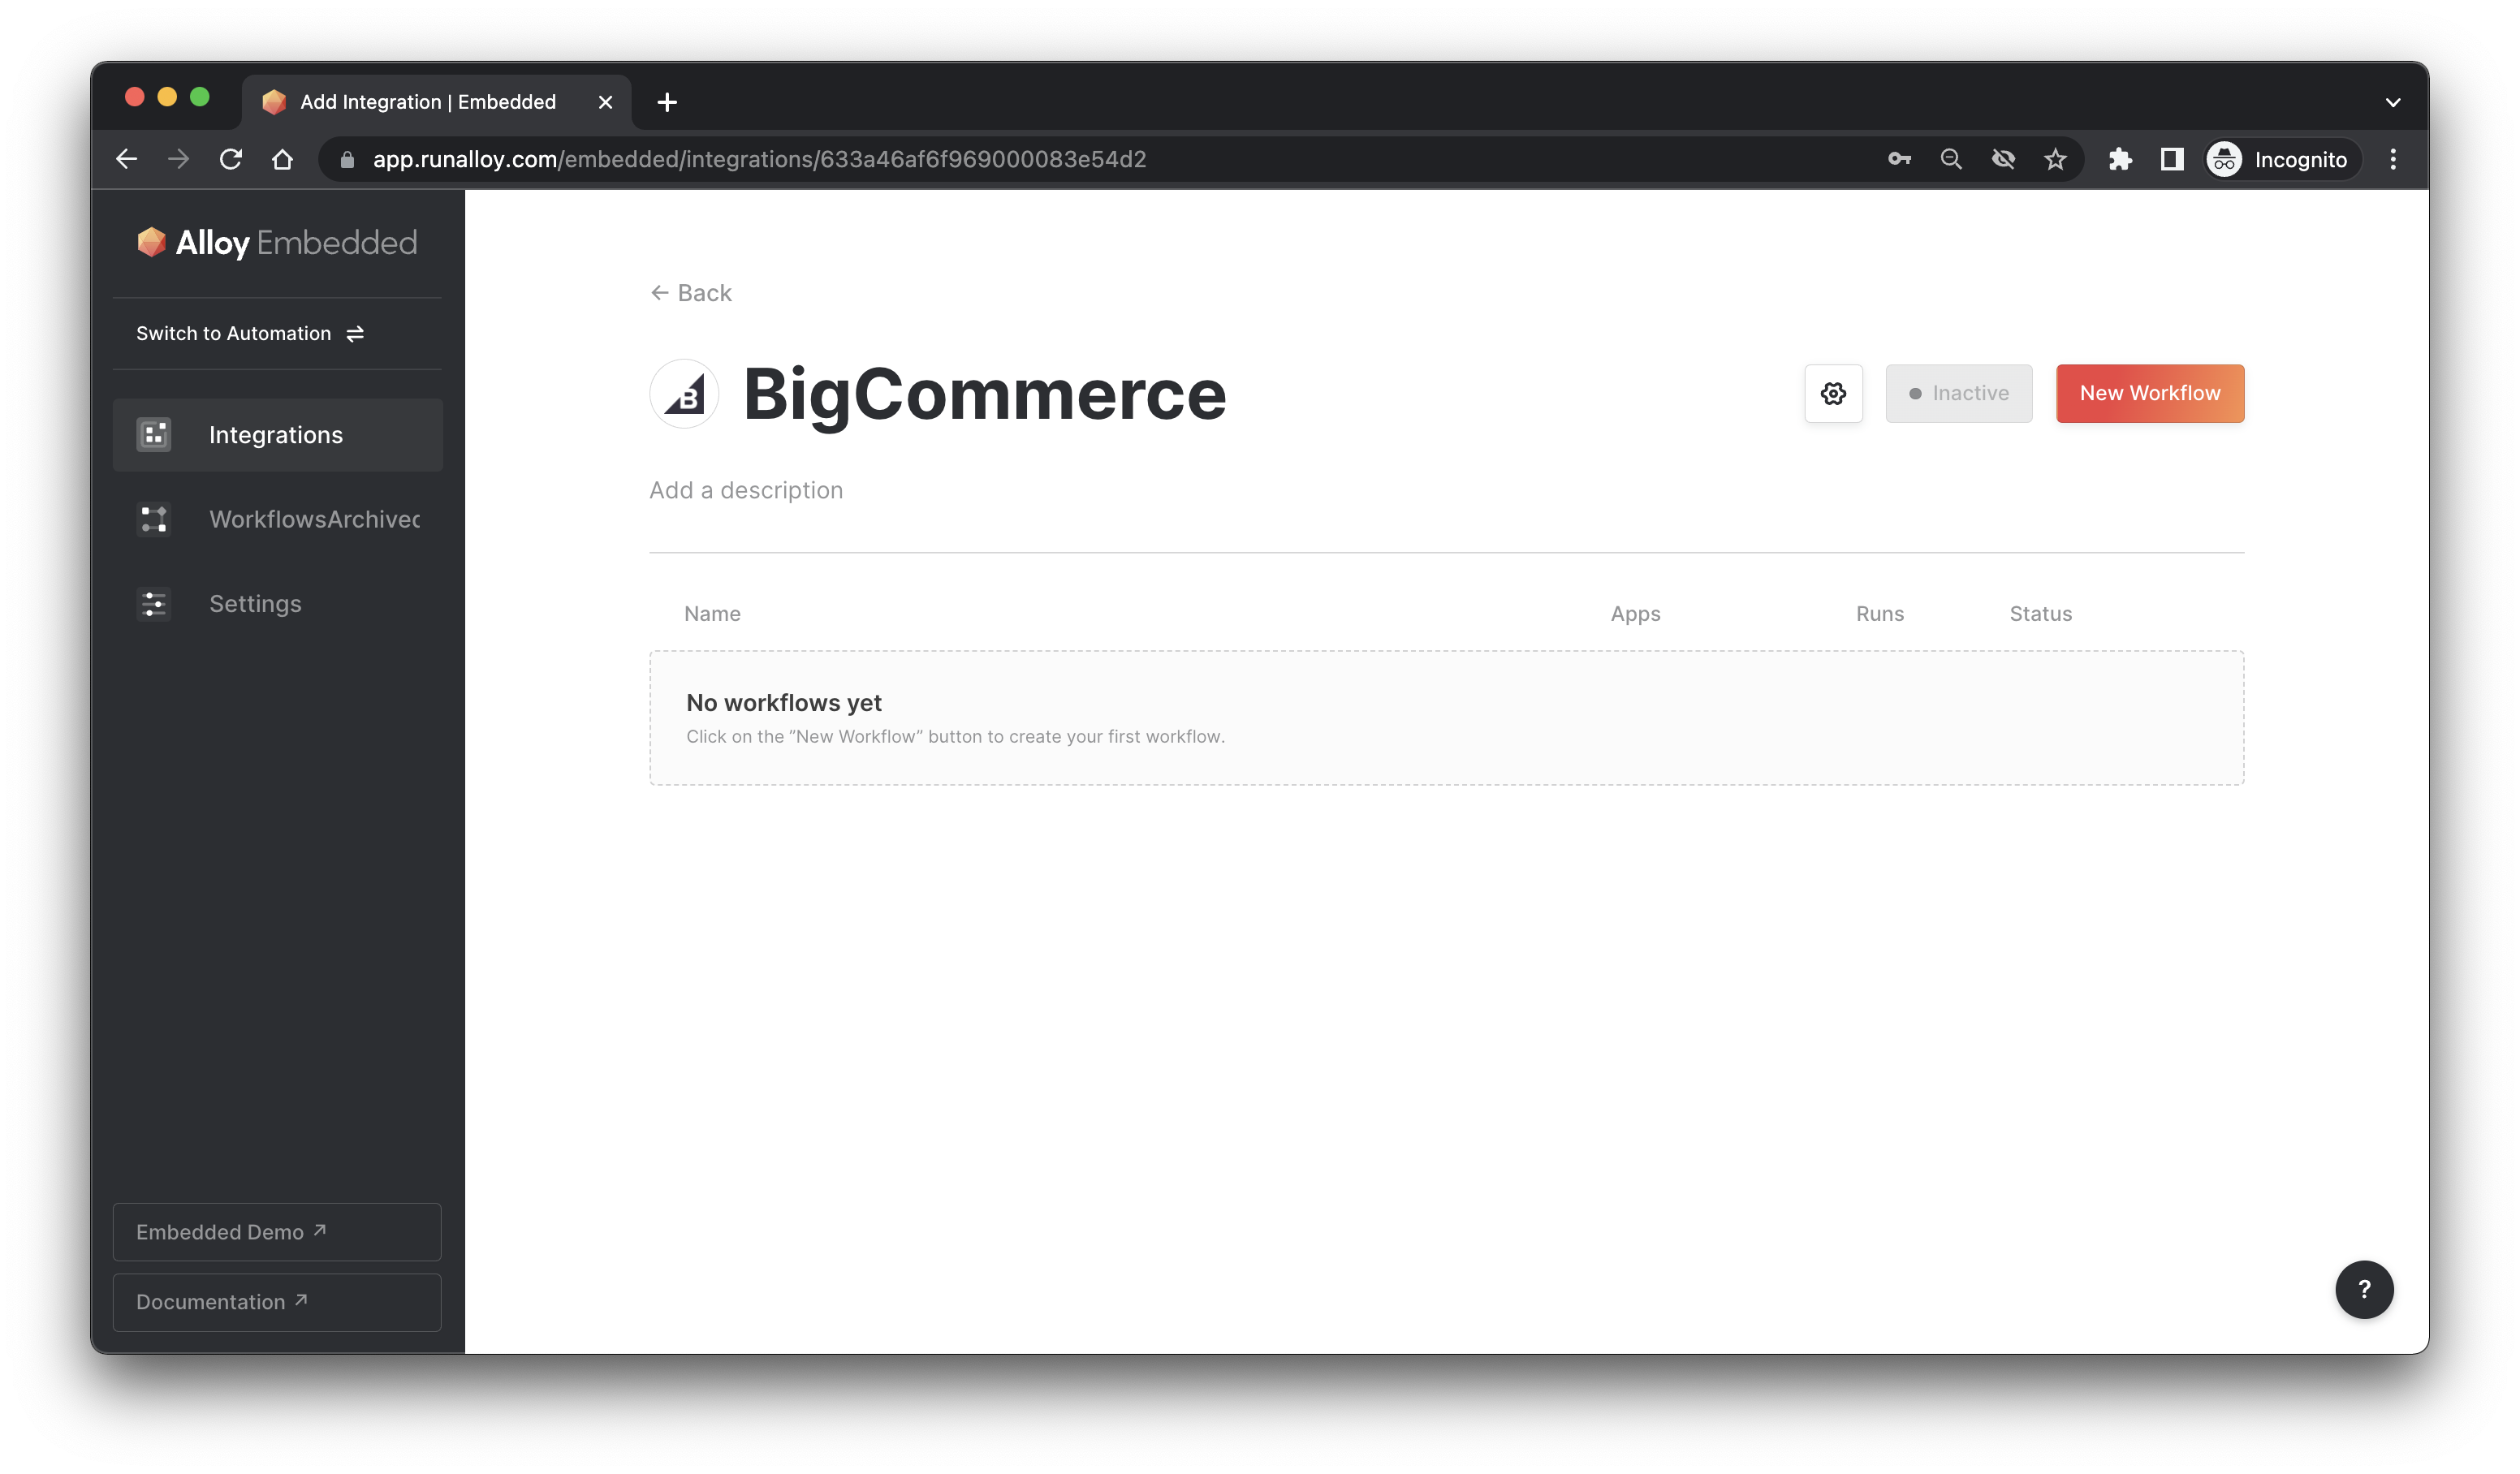
You’ll be taken to the Alloy Workflow builder. From here, let’s build out “When a new order is created in BigCommerce, create a new task in Fulfillmently”.
To build this workflow, follow the simple steps below:
First, give your workflow a descriptive name on the top left corner of the workflow builder.
Next, select BigCommerce Trigger as your event. This tells Alloy Embedded where to listen to.
Lastly, locate the "Stream Data" block and add it to the canvas. Enter the URL of the destination where you want to stream the BigCommerce order data to. This will invoke an outgoing API call to a webhook URL you specify each time the BigCommerce event is invoked.
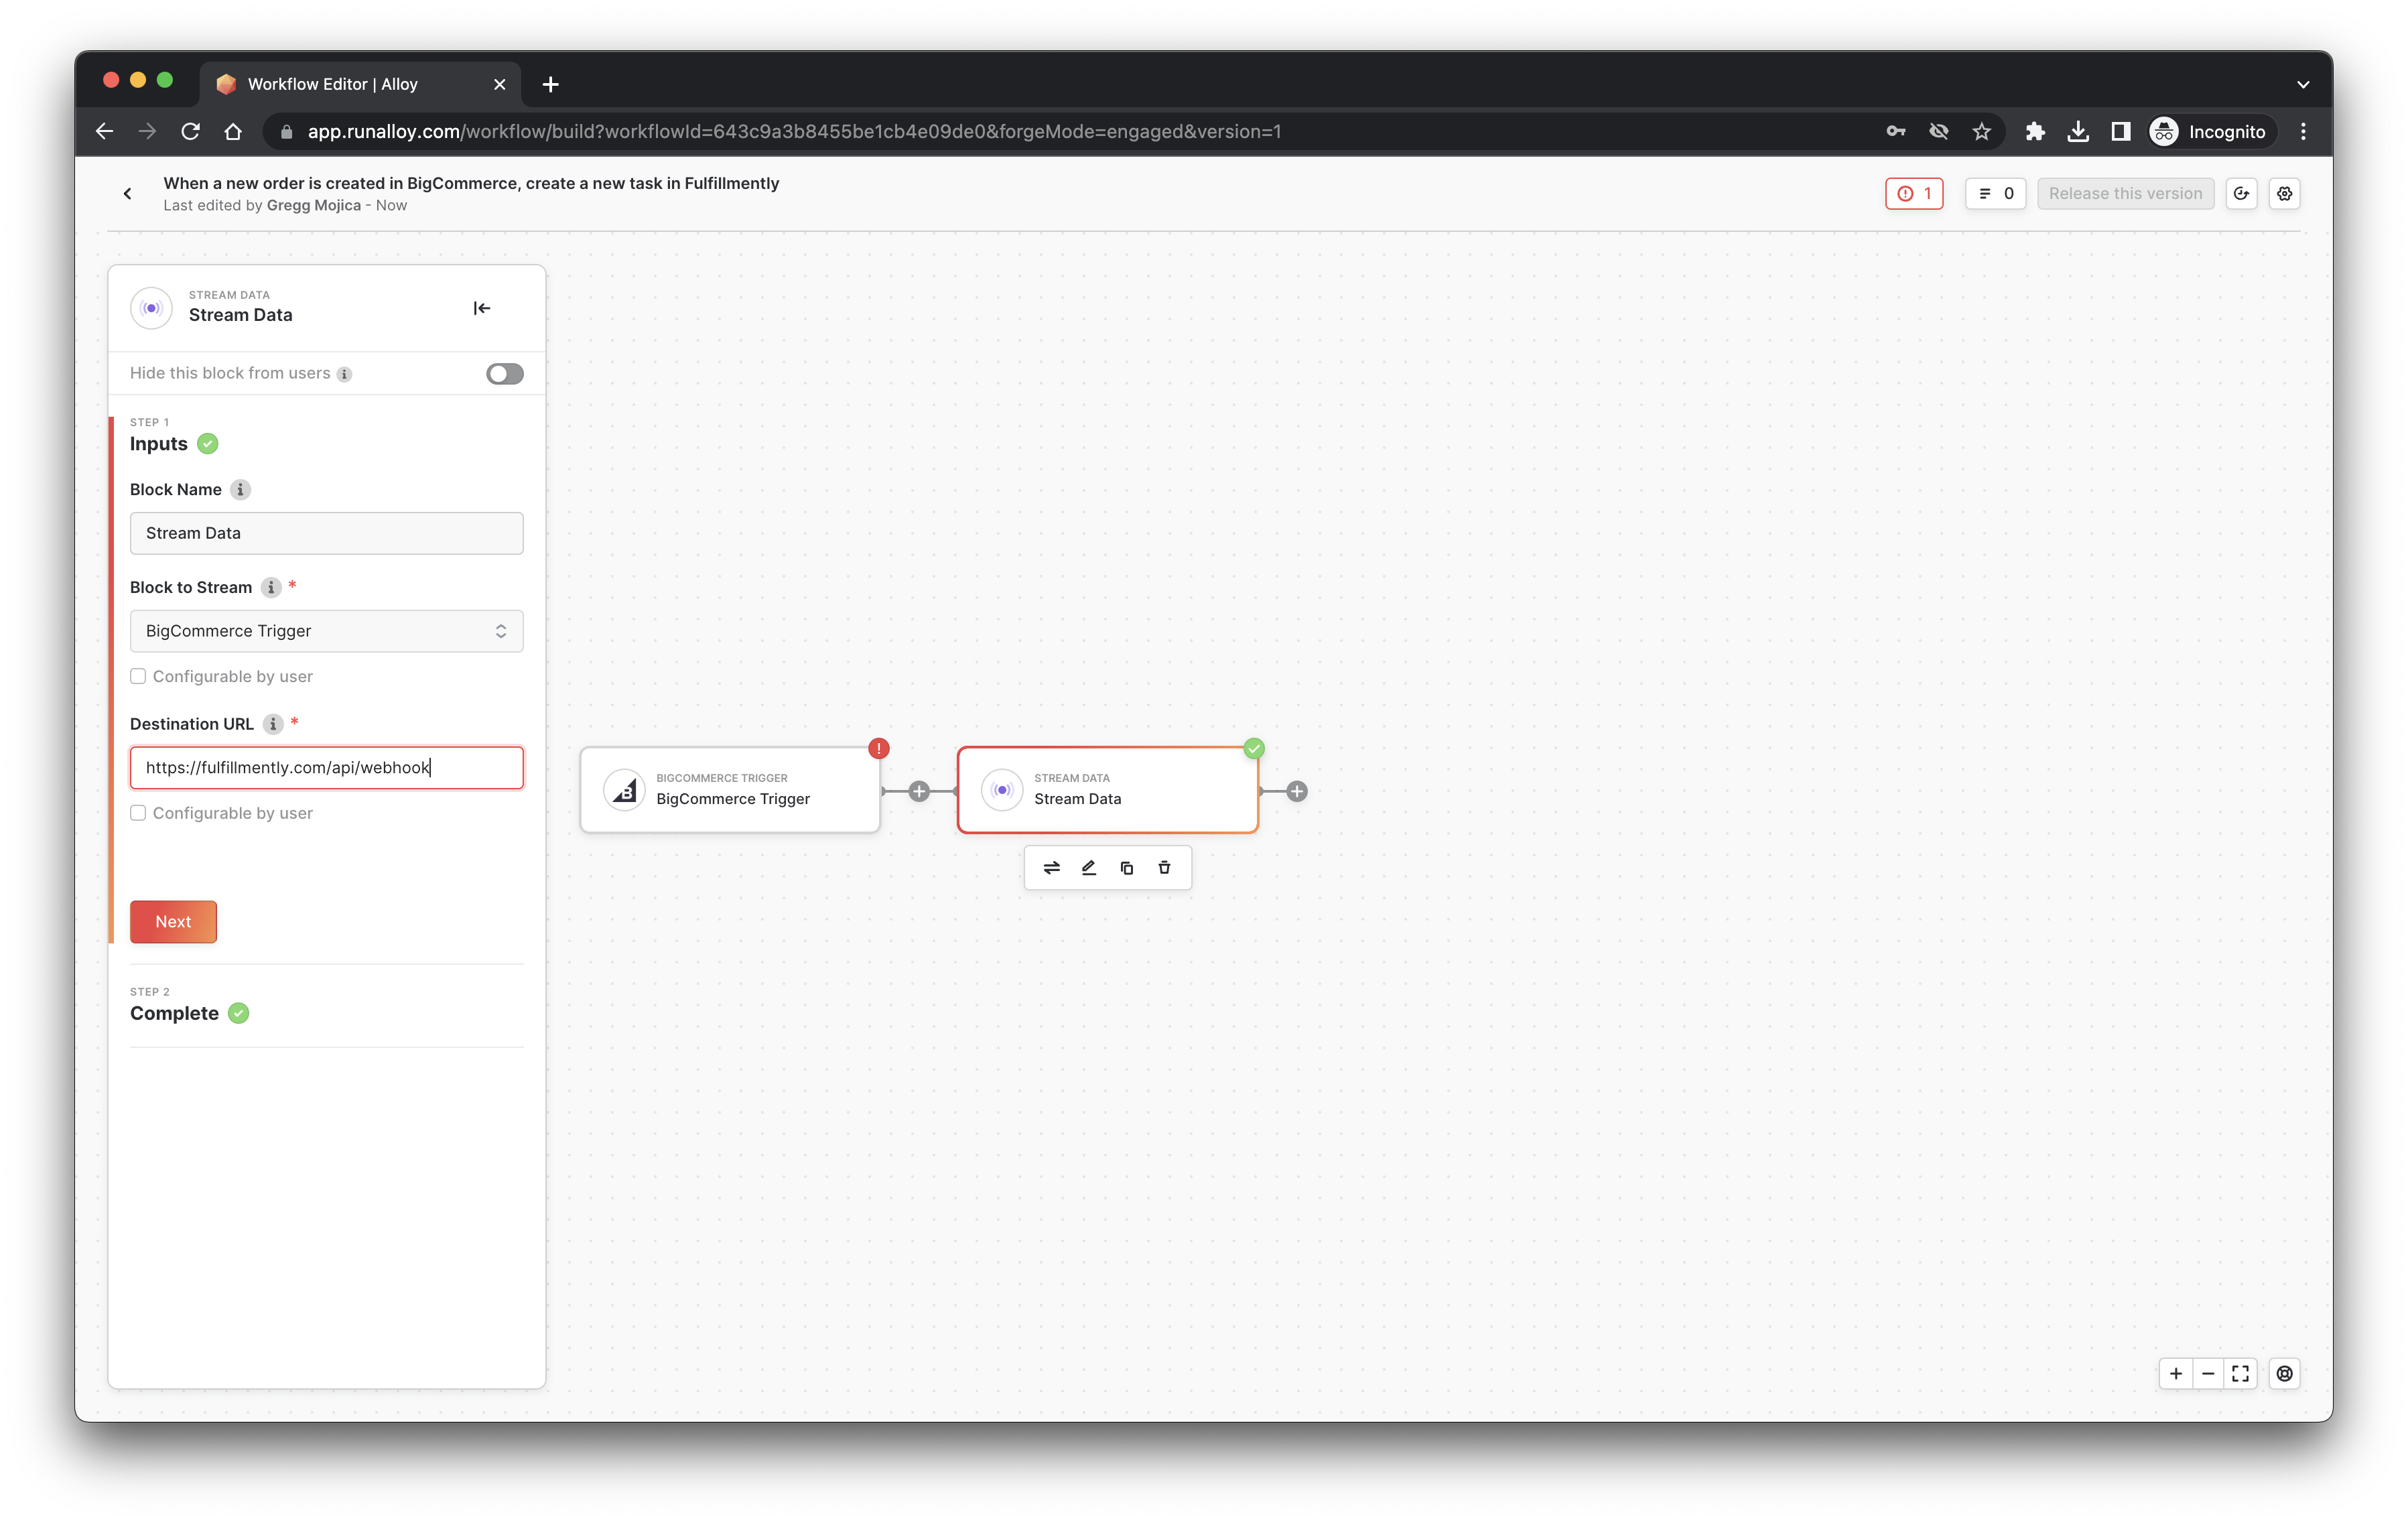
When you're done, hit the "Release this Version" button to publish the workflow. This will make it available to your users for installation via the frontend SDK.
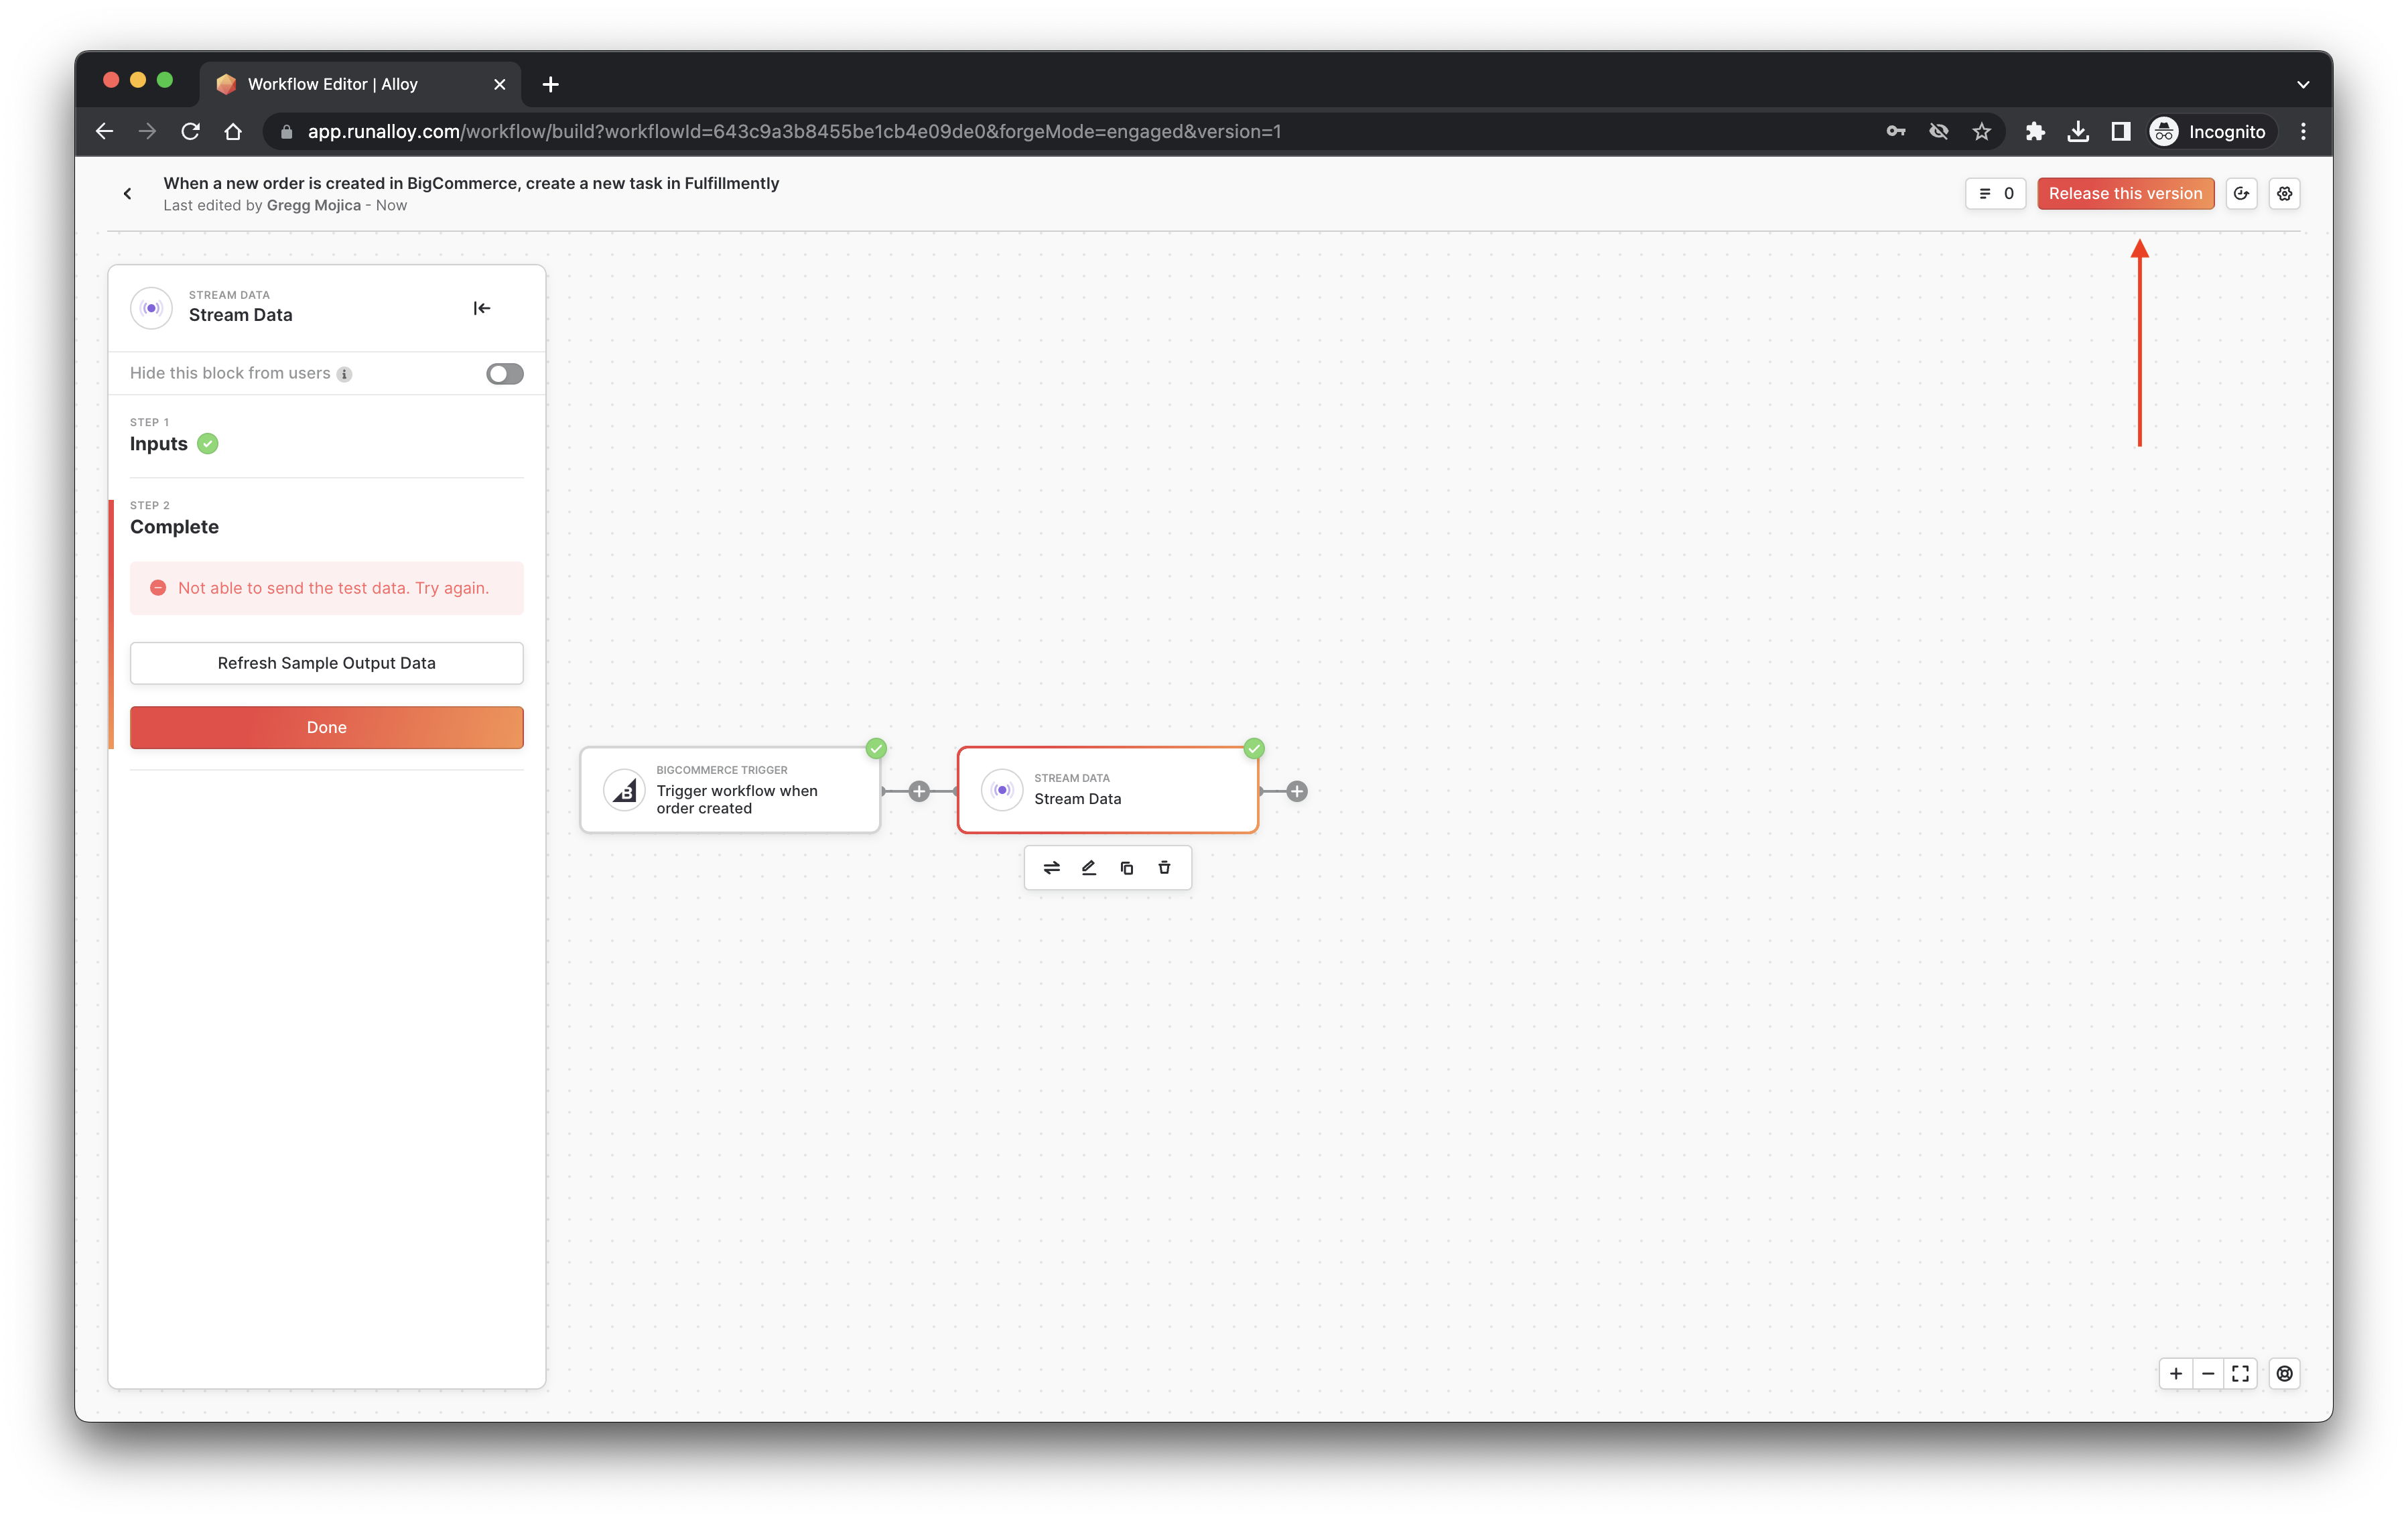
In this example, we elected to stream data back to our own webhook. However, you can also stream data to any of our various destination blocks including data warehouses like Snowflake, databases like MySQL, or even ingestion pipelines like Amazon EventBridge.
The Second Workflow: Your App → BigCommerce
For your second workflow, “When a fulfillment status is updated, update the order status in BigCommerce”, the workflow will be triggered from your application. Let’s build that now.
To get started, select the Custom Event to invoke your workflow. A Custom Event is a special type of event block that allows you to specify the payload to send to the destination block. Because we want to update order status in BigCommerce, we'll need to supply BigCommerce with some data to do this.
We will define our payload schema as seen below. Make sure to name your event with something descriptive – in this example, we'll call our event Fulfillment Updated.

When you define a custom event, you can reuse that event across multiple workflows – any workflows with that event will be automatically invoked. To invoke a custom event, you can do so via our SDKs or with the Run Event endpoint.
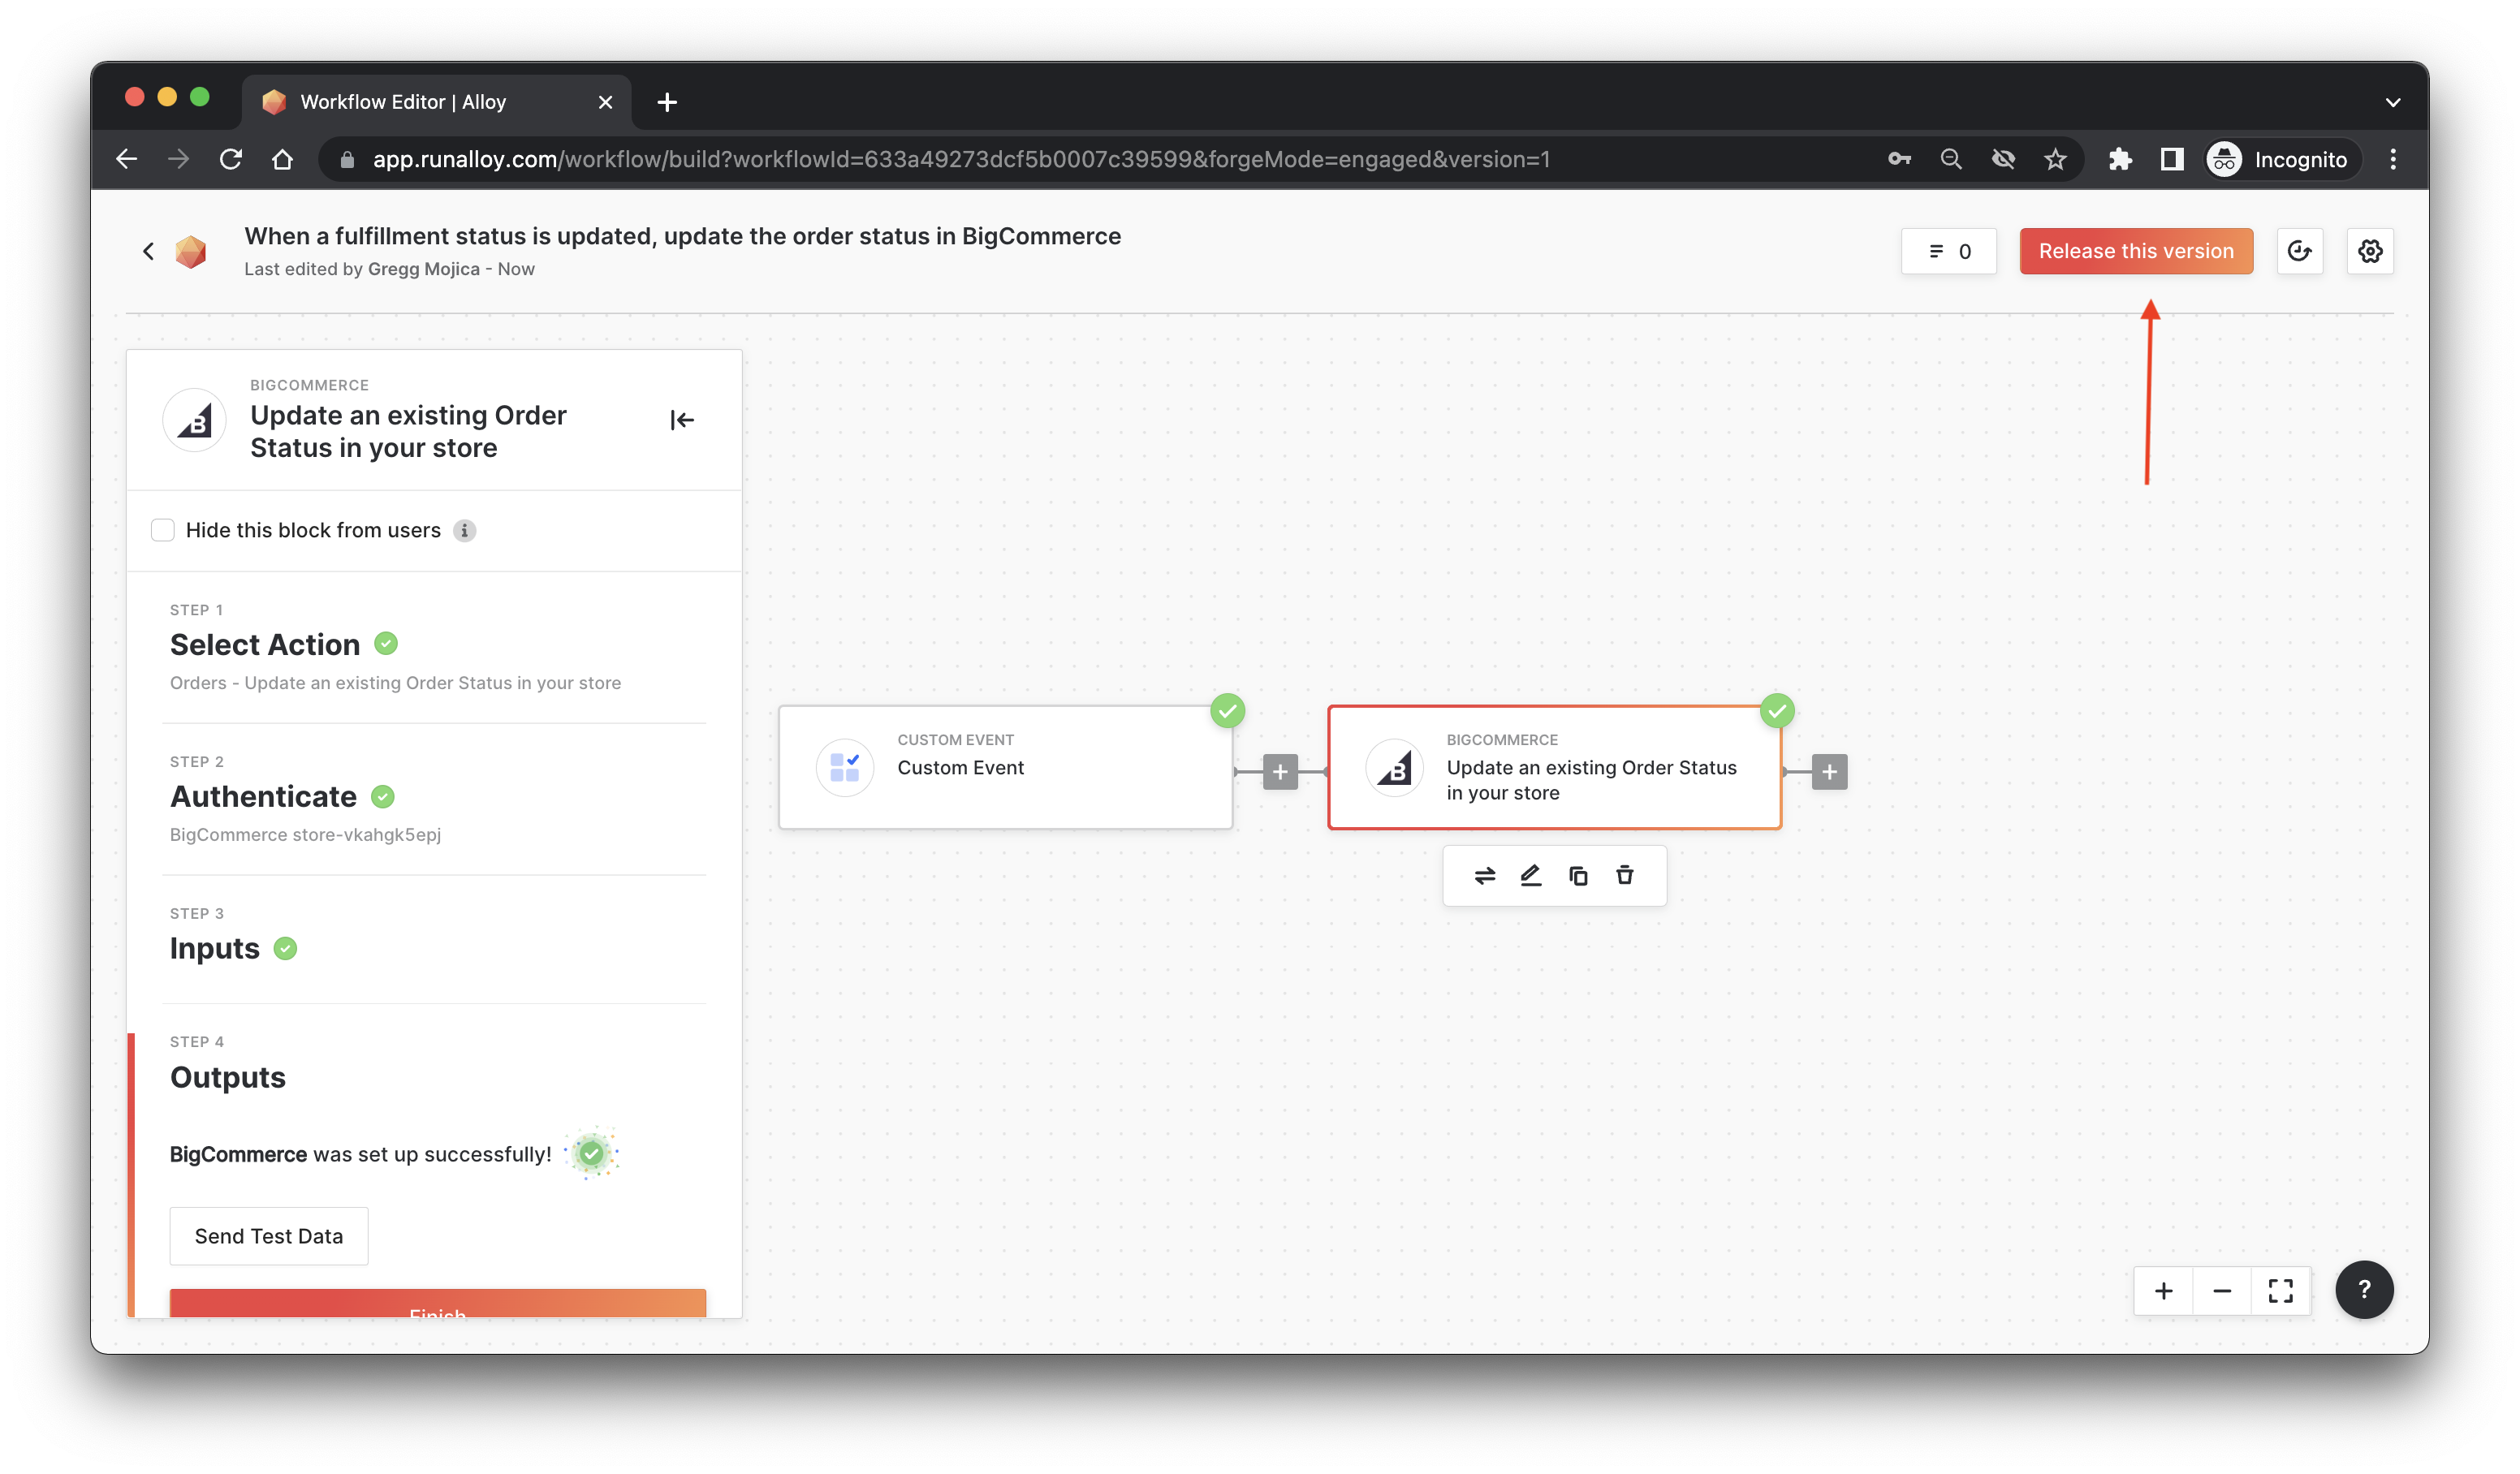
For the destination, select BigCommerce. When presented with the action selector, search for “update an existing order status" because this integration will update the order status each time an order is fulfilled in our app.
Then, choose the input parameters that will be passed to BigCommerce. This is called data mapping.

When you're done, once again click the Release this Version button.

Excellent! Now that you have your two workflows created. We can implement the user interface for your users to install these integration workflows. Just activate both workflows and that’s it – you’ve successfully built your very first integration on Alloy Embedded.
Step 2: Setting up the Code
Generating an API Key
Now that you’ve built your first integration, let’s switch gears and start configuring your platform to work with Alloy Embedded.
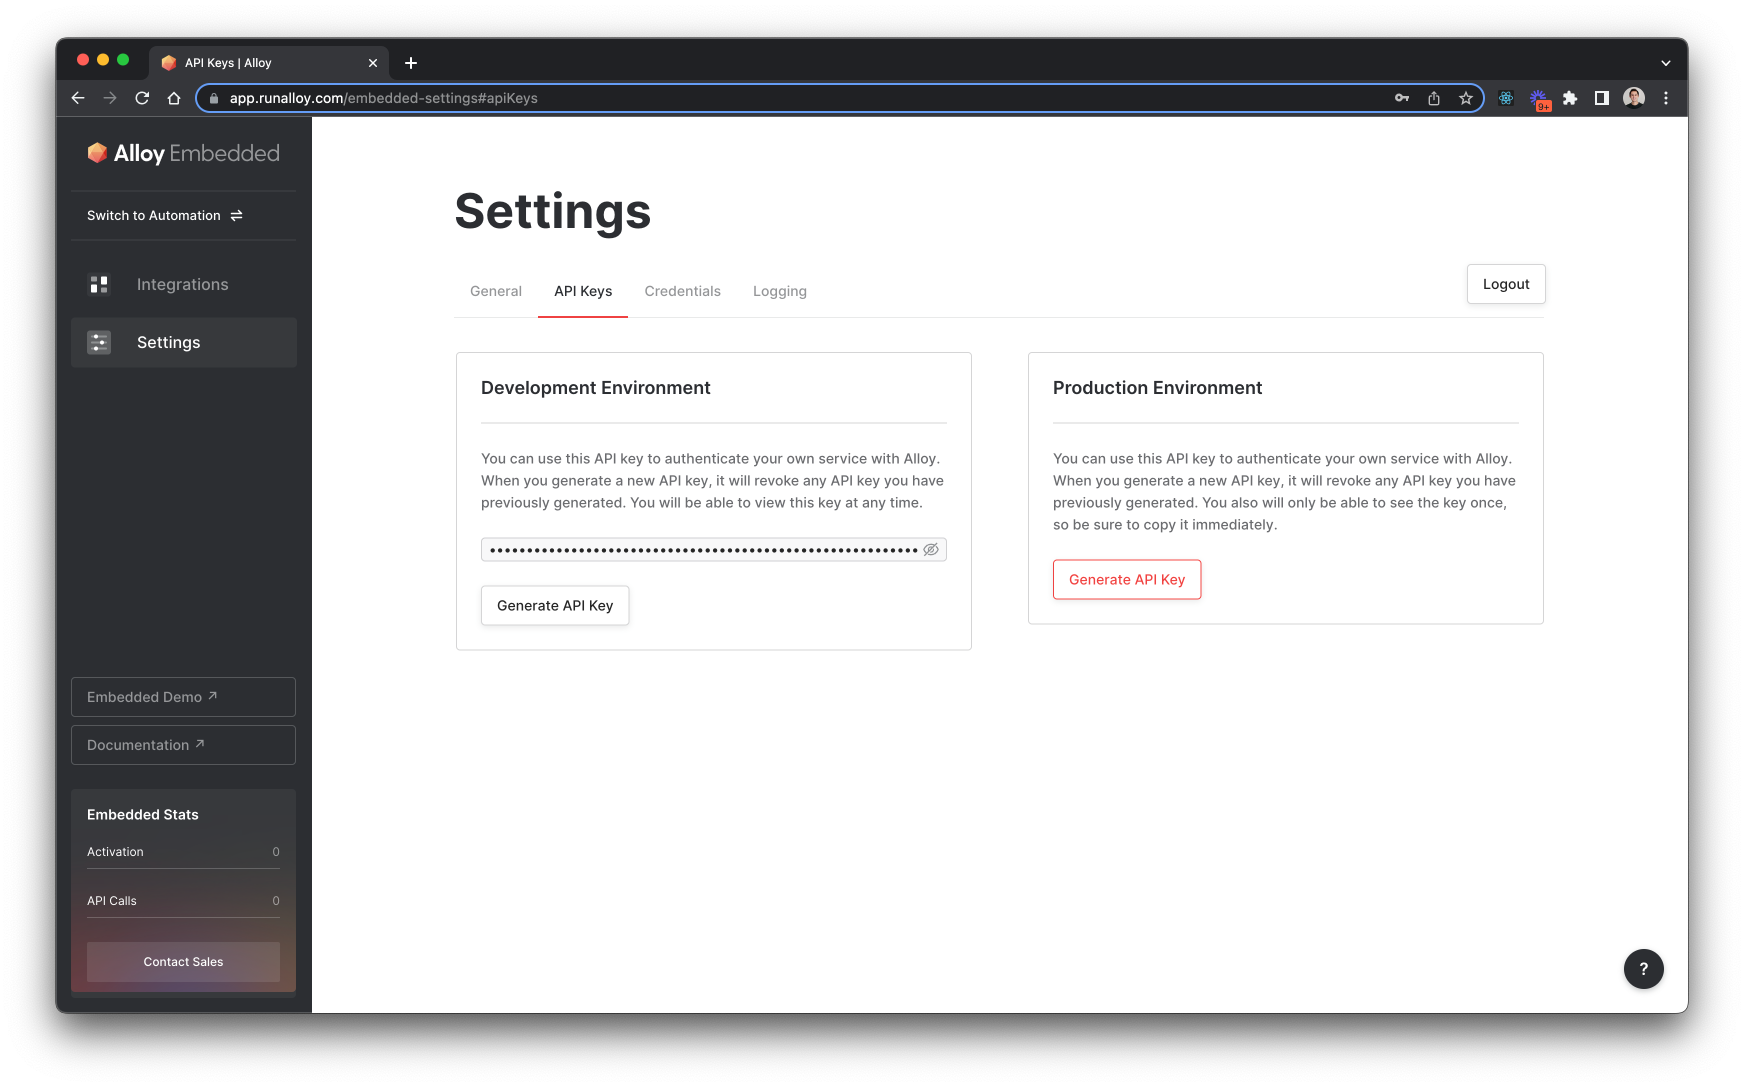
To get started with Alloy Embedded, let’s begin by setting up the basic infrastructure you’ll need to get going. Everything starts with the API Key. We use the API key as a secret to identify who is making the request. As you might suspect, API Keys are meant to be kept secret and should never be exposed to users (we recommend storing your API key in a secure location like AWS Secrets Manager).
To generate your API key, let’s navigate back to the Embedded Dashboard and head on over to the Settings page. From here, select API Key and under the Development Environment box, click Generate API Key. Since we’re just poking around, we’ll want to use this key for testing purposes. When you’re ready to go live, make sure to switch to the Production Environment first.
Wonderful! Now that you have your API key in hand, let’s make our very first API call. In Embedded, in order to interact with any integrations, you first need to create a user.
The user is an object that represents a merchant and is used to house any workflows they activate including any related API keys or tokens associated with their workflow(s). You’ll want to make this API call on your backend – likely when a user signs up. Under the hood, invoking this endpoint will create an Alloy Embedded account for the user.
If you need to create a large number of historical users, we've introduced a Batch User Creation endpoint for this purpose.
Fortunately, creating a user is easy! To get started, make an API call to the POST /user method. We’ve included an HTTP snippet below. Be sure to pass your API key along in the header. This endpoint requires a username and an (optional) fullName be passed over.
curl --request POST \
      --url https://embedded.runalloy.com/2023-06/users \
     --header 'Accept: application/json' \
     --header 'Content-Type: application/json' \
     --header 'Authorization: bearer YOUR_API_KEY' \
     --data '{ "username": "gregg" }'
Once you’ve invoked this method, it’ll return a userId. Depending on how you architect your system, you might want to store this identifier for later use in your database.
Listing Integrations
Excellent! Now that you’ve successfully created your first user, let’s next make an API call to the GET Integrations endpoint. This endpoint returns a list of all the activated workflows in your Embedded account. Typically, we see folks using this endpoint to power an integrations page.
curl --request GET \
     --url 'https://embedded.runalloy.com/2023-06/integrations?userId=<YOUR_USER_ID>' \
     --header 'accept: application/json'
     --header 'Authorization: bearer YOUR_API_KEY'
Note that you must pass the userId as a query string parameter when invoking this endpoint.
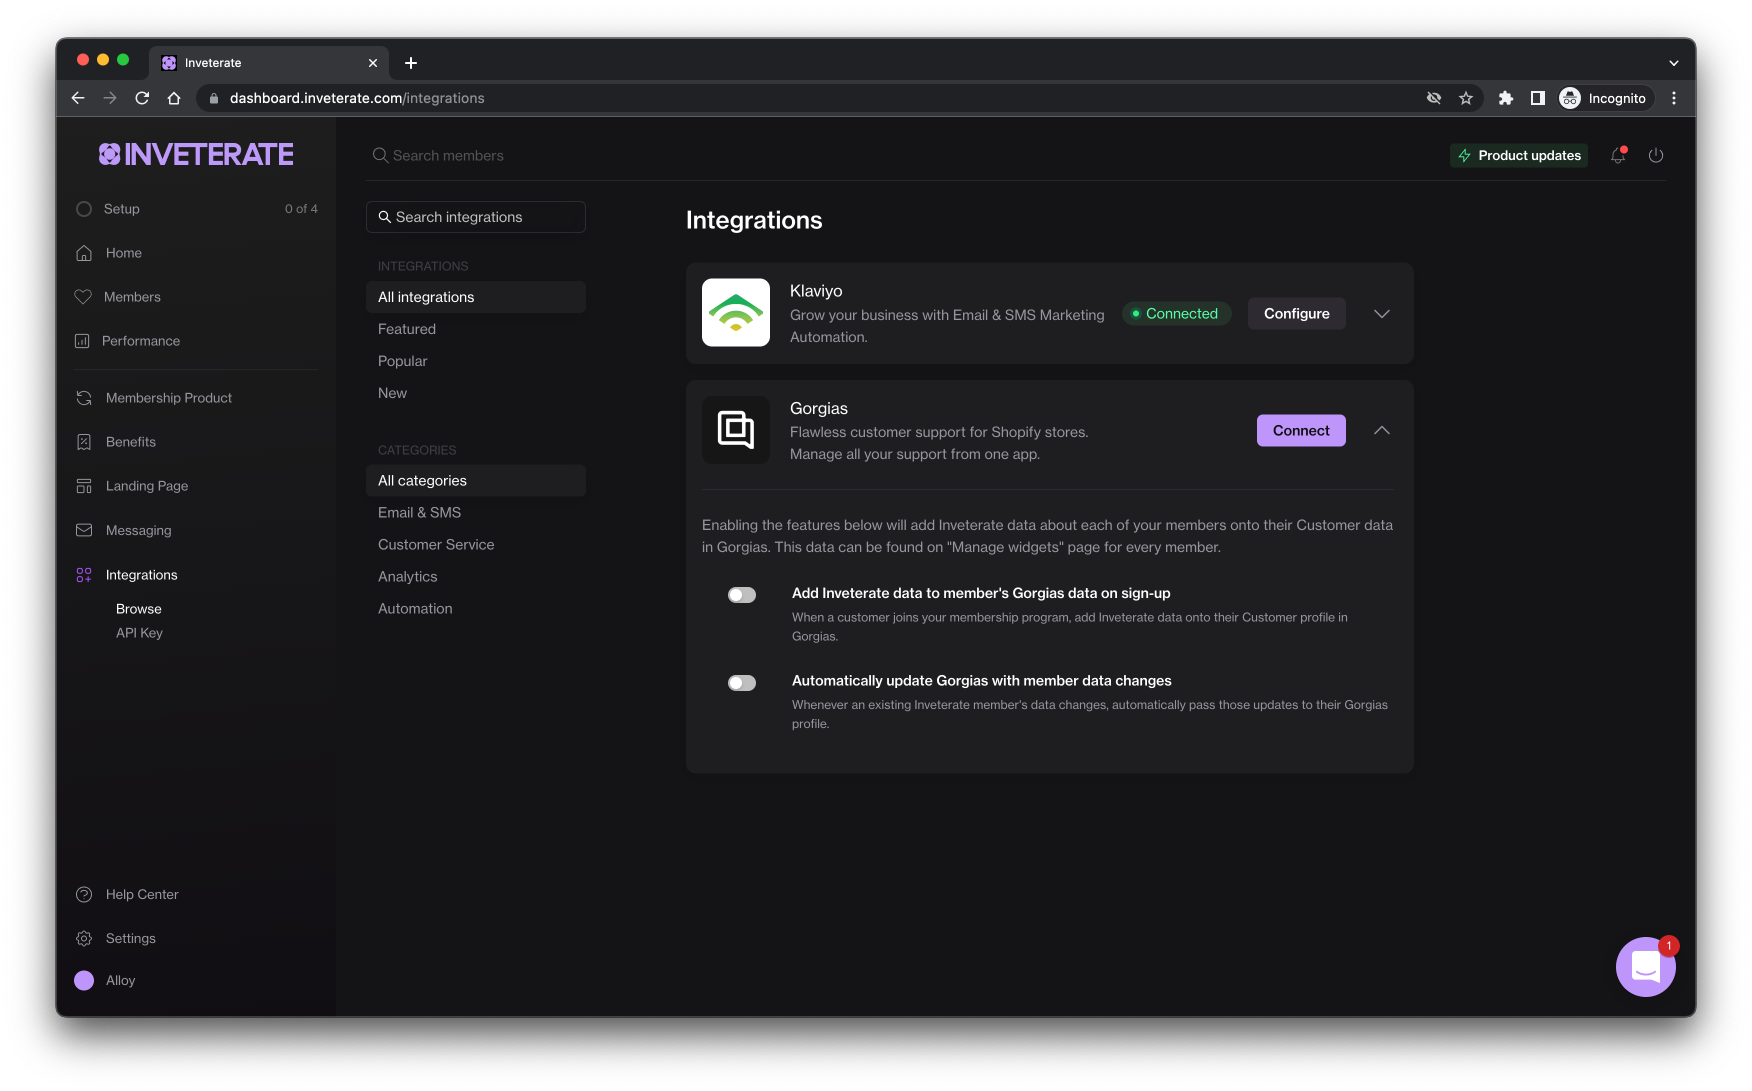
You can find an example of a real customer using the GET Integrations endpoint to populate their integrations page in Figure 1.1 below.
Figure 1.1 – Example Integrations Page
This is a live customer (Inveterate) using Embedded to power their integrations. Behind the scenes, the GET Integrations endpoint populates the data for this page.
For each integration that’s returned by the GET Integrations endpoint, we return an array of workflows which each contain a corresponding workflowId . Keep an eye on this as we’ll use it in a moment to instantiate the Embedded Modal.
We also return a status indicating if the workflow has been installed by the user yet. This is denoted by the installed key which has a boolean value of true or false.
This endpoint also returns installedVersion and version keys. The version key reflects the most updated and currently released version. The installedVersion represents the latest version this user has installed. If the version is greater than the installedVersion you'll want to prompt your users to update to the latest version.
Now that you know how to render the content of an integrations page, naturally, users will want to activate an integration. To do this, we’ll need to present the Embedded Modal so we can collect some basic authentication details.
In Figure 1.2 below, you’ll find an example of the Embedded Modal for our BigCommerce workflow.
Figure 1.2 – Embedded Modal
This example shows how our single BigCommerce → Fulfillmently workflow would appear to the merchant in the form of the Embedded Modal.

Rendering the Modal
For security reasons, we require generating a JSON Web Token to securely render the Embedded Modal on your frontend. This token can be generated by making an API request to the GET /user/:userId/token endpoint on your backend. You must pass the userId . This endpoint will return a short lived JSON Web Token which you can pass to your frontend. Let’s take a look at that now.
curl --request GET \
     --url https://embedded.runalloy.com/2023-06/user/:userId/token \
     --header 'Accept: application/json' \
     --header 'Authorization: bearer YOUR_API_KEY'
This request will return a JSON Web Token, as discussed, that looks something like the following. You’ll want to save this on your frontend temporarily. Note that this token is only valid for an hour so you’ll need to regenerate it again if you intend to invoke the modal again and that it’s user-specific meaning that you’ll need to generate a new token for each user you want to render the Embedded modal for.
{
	"token": "XXXXXXXX.YYYYYYYYY.ZZZZZZZZ"
}
To install the frontend SDK, import the following file into the header of your application. You can read more about how to use the Frontend JavaScript SDK here.
<script src="https://cdn.runalloy.com/scripts/embedded.js" type="text/javascript"></script>
Now that you have your token in hand, let’s invoke the frontend SDK to show the modal. We can do this by invoking Alloy.install(). This method tells the frontend to show the modal
💡 Note: if you’re interacting with the Alloy.js SDK from a react app, you can call these methods by invoking
window.Alloy.install().
Now that you have the SDK installed the first thing you'll need to do in order to render the Embedded Modal is to pass the frontend SDK your JWT. As mentioned earlier, a JWT is required to securely authorize the user. Once you've made a request to the Embedded APIs to retrieve your short lived token, you can set the token in the frontend SDK using the setToken method.
All frontend SDK methods require that you must first invoke setToken.
Alloy.setToken("<YOUR_TOKEN>");
The install Method
Let’s take a deeper look at the install method below. This method tells the frontend SDK to render the Embedded modal for the user specific to the JWT you generated.
You can read more about the various optional arguments you can pass over here.
For simplicity, we'll install the entire integration (and all the associated workflows) at once. To do so, you can make an invocation as seen below.
Alloy.install({
  integrationId: "633a39aaa0c6f21cbaf58df1",
  callback: () => { console.log(); },
  alwaysShowAuthentication: true,
  hide: false,
  title: "My Cool Shopify Integration"
});
Wonderful! We’re really off to the races now. Once the callback is invoked, your workflows will be activated and run every time an event occurs as specified in the workflow configuration.
Next, let’s take a look at calling our Fulfillmently → BigCommerce workflow each time an event happens in your platform.
Invoking Workflows from the Backend
Now that we’ve successfully rendered the modal and activated our two workflows, let’s take a look at how we can invoke the Fulfillmently → BigCommerce workflow from the backend. Recall that this workflow uses a custom trigger, meaning that it updates an order status every time an event happens on your platform and therefore must be invoked by your backend.
To refresh your memory from earlier (I know, it’s been a lot!), we defined the following custom schema to be sent over to Alloy each time this workflow is invoked.
{
    "orderId": "String",
    "status": "String"
}
So switching to the backend, let’s invoke the custom event. To invoke the event, make an API call to the Run Event endpoint. You'll need to pass over the event name and the corresponding userId you want to invoke the event for.
You can pass along any custom data you defined in event the schema. Recall that our event was named "Fulfillment Updated" so we'll pass that as the event name to the Run Event endpoint as seen in the example below.
This will immediately invoke any workflows with the event.
curl --request POST \
   --url https://embedded.runalloy.com/2023-06/run/event \
   --header 'accept: application/json' \
   --header 'content-type: application/json' \
   --header 'Authorization: bearer YOUR_API_KEY' \
   --data '{
      "event": "Fulfillment Updated",
      "userId": "00001",
      "data": {
          "orderId": "123",
          "status": "FULFILLED"
      }
 }'
You can also use our backend SDKs to invoke an event. Learn more here.
And that’s it! You have now successfully set up and invoked a custom workflow on Alloy Embedded. Congratulations!
Step 3: Go Live
Excellent work getting this far – we’re almost done. In this section, we’ll look at putting some finishing touches on our implementation before we call it quits. Let’s dive in.
Error Handling
We’ve all been there – something doesn’t work out exactly as you had hoped. This is an all too common situation and unfortunately, sometimes things just break. Whether it’s an error because a merchant unauthenticated their integration or something just broke on the app’s API, errors do happen. To address this, we’ve set up some error handing endpoints to make your life a bit easier.
The GET Error Logs endpoint accepts a workflowId as an argument and returns some basic information about the error. You can see an example below.
Example Invocation
curl --request GET \
     --url https://embedded.runalloy.com/2023-06/workflows/:workflowId/errors \
     --header 'Accept: application/json' \
     --header 'Authorization: bearer YOUR_API_KEY'
The response data includes the error message , the block that errored, and the errorOccurredAt date stamp.
Response Data
{
  data: [ {
    workflowId: '632531cf3beb6c98611abd09',
    block: 'shopify',
    errorOccurredAt: '2022-09-17T22:12:34.567Z',
    message: 'The customer failed to create due to an invalid Id'
  }]
}
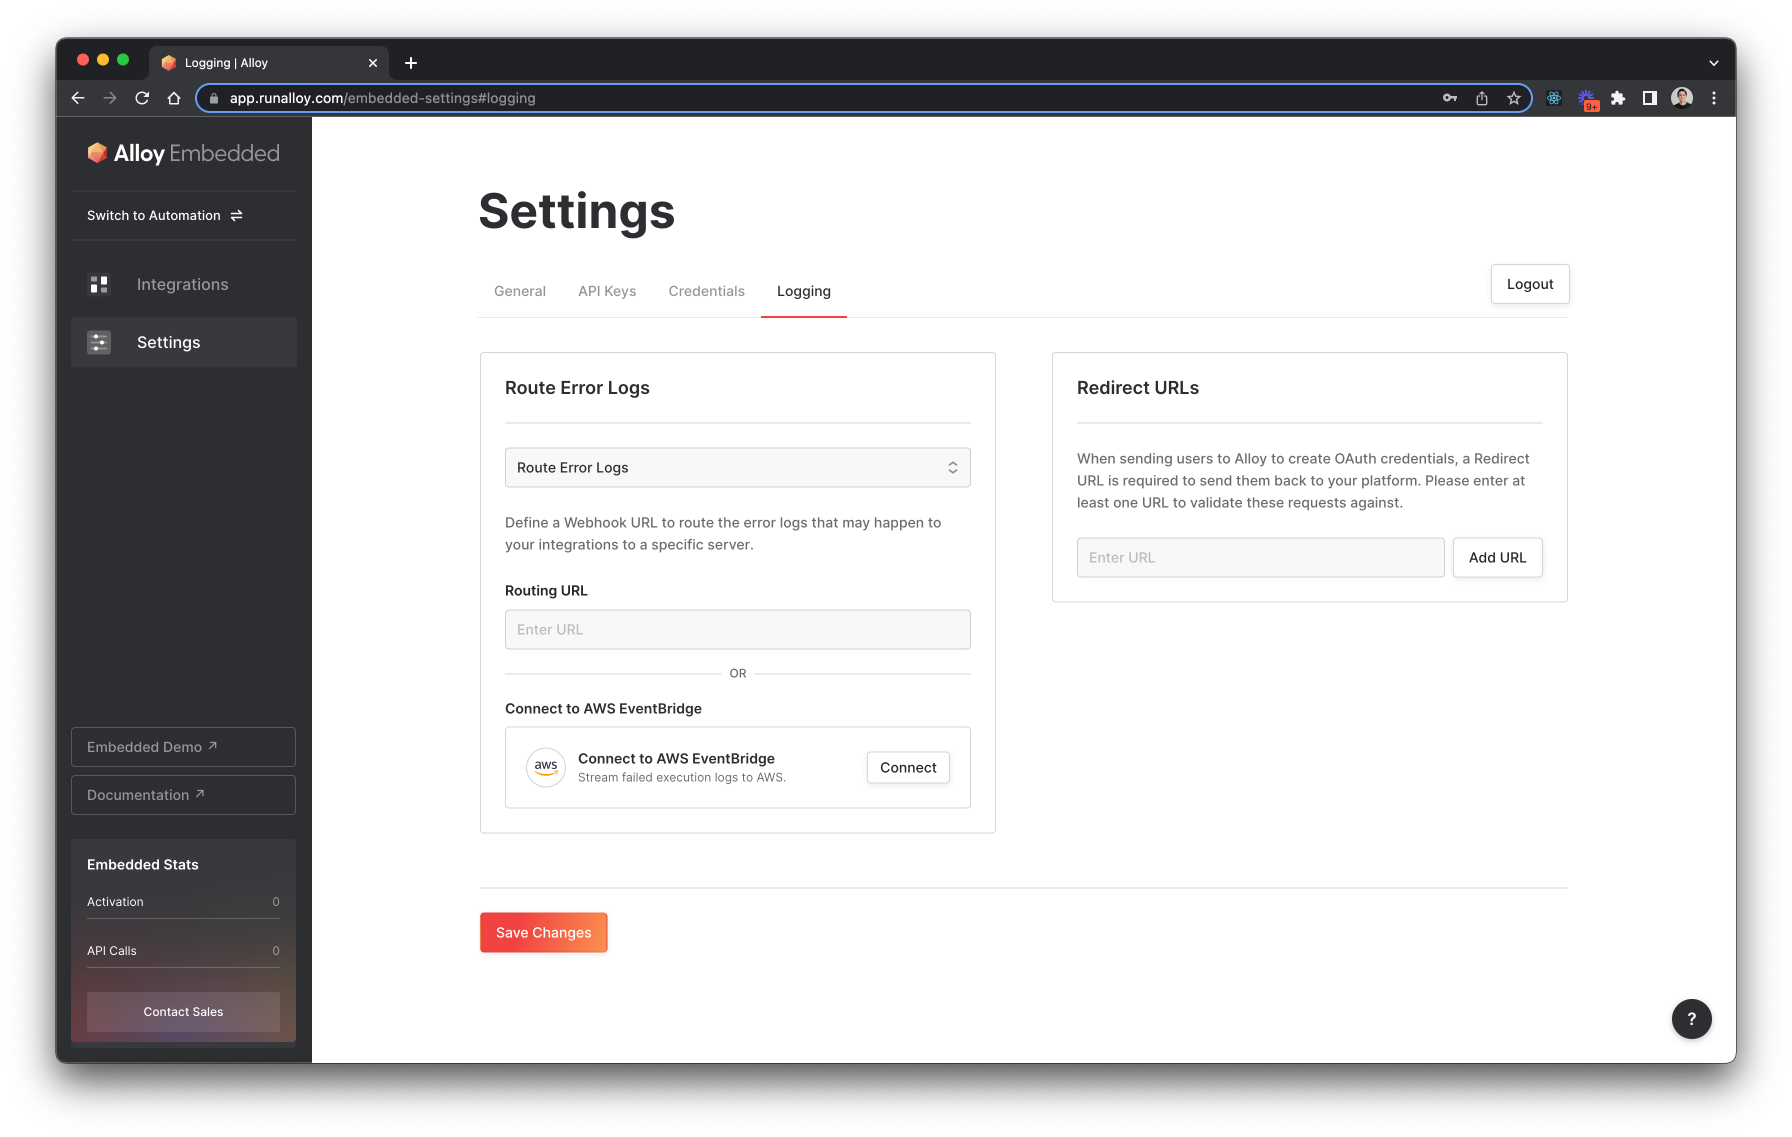
You can also specify to stream error logs in real time to an API on your server by navigating to the Settings → Logging section in Embedded and selecting the Route Error Logs option
Deactivating and Re-activating Workflows
Sometimes you’ll want to turn off workflows. This could happen for a number of reasons: perhaps an API starts failing, the user revokes the authentication, etc. Whatever the reason, if you want to deactivate a workflow, invoke the PUT /workflows/deactivate endpoint by passing in the userId and the workflowId.
curl --request PUT \
     --url https://embedded.runalloy.com/2023-06/workflows/deactivate \
     --header 'accept: application/json' \
     --header 'content-type: application/json' \
     --header 'Authorization: bearer YOUR_API_KEY' \
     --data '{
     "userId": "00001",
     "workflowId": "632531cf3beb6c98611abd09"
   }'
You can reactivate the workflow at any time by invoking the PUT /workflows/activate endpoint with the same payload as above.
Upgrading Workflows
You will often find yourself needing to upgrade a workflow for your end users anytime you create a new version of the workflow. We have added a programmatic approach to this to better streamline the process for everyone.
The workflows/{workflowId}/upgrade endpoint allows you as the ISV to upgrade the workflow for a specified end user. However, in order to upgrade a workflow via this endpoint, the new workflow must have the same configurable fields as the original. If any new configurable fields were added, you will not be able to upgrade the workflow programmatically and instead would need to reinstall the workflow for the end user.
Workflow Logs
To return specific data about a workflow, for example, the response data, over time, you can make a request to the GET /workflow/:workflowId/logs endpoint.
curl --request GET \
     --url 'https://embedded.runalloy.com/2023-06/workflows/:workflowId/logs?userId=:userId' \
     --header 'accept: application/json' \
     --header 'Authorization: bearer YOUR_API_KEY'
This endpoint will return an array of executions. An execution represents a single workflow run. For example, if the workflow has been invoked 100 times, you’ll be able to see 100 invocations and the associated logs for each invocation.
⚠️ Note that Alloy Embedded stores logs for 60 days. Any logs older than 60 days are automatically deleted and cannot be retrieved.
Compliance
As with any integration system, the need to redact data upon user request may occur. To prepare for this, we’ve set up a deletion endpoint you can invoke upon a user request. This can be useful when addressing GDPR requests.
curl --request DELETE \
     --url https://embedded.runalloy.com/2023-06/users/:userId/logs \
     --header 'Accept: application/json' \
     --header 'Authorization: bearer YOUR_API_KEY'
Wrapping up
And that’s a wrap! In this tutorial, we’ve looked at how to build an integration with Alloy Embedded, how to setup workflows and configure them to stream data bidirectionally, and how to implement the Alloy Embedded APIs in your product.
As always, please refer to our API documentation which contains detailed descriptions of every Alloy Embedded API we support. We’re constantly improving Alloy Embedded, so if you have thoughts, questions, suggestions, please don’t hesitate to reach out to your support representative. Happy building!
Updated 10 months ago